Connecting your Windows laptop to an external display via HDMI is a common way to expand your workspace, enjoy movies on a bigger screen, or give presentations. When your HDMI not working on Windows laptop, it can be frustrating, leaving you with a blank screen or no audio. This common issue can stem from various sources, ranging from simple cable problems to complex driver conflicts.
The High-Definition Multimedia Interface (HDMI), first introduced in 2002, revolutionized how we connect audio and video devices. Before HDMI, you often needed multiple cables (VGA or DVI for video, and separate audio cables) to connect a computer to a display. HDMI simplified this by carrying both high-definition video and audio signals over a single cable, becoming the industry standard for consumer electronics and PCs. Its widespread adoption means that troubleshooting connection issues is a crucial skill for any modern computer user. This guide will walk you through a comprehensive set of solutions to diagnose and fix HDMI not working on your Windows laptop, from the simplest checks to more advanced driver management.
Understanding HDMI Connections
Before troubleshooting, it’s helpful to understand the components involved:
- HDMI Port (on Laptop): The physical port on your laptop that sends the signal.
- HDMI Cable: The cable that carries both video and audio signals.
- HDMI Port (on Display): The physical port on your TV, monitor, or projector that receives the signal.
- External Display: Your TV, monitor, or projector.
- Graphics Driver: The software that allows your Windows laptop to communicate with its graphics hardware and output video signals.
- Audio Driver: The software that handles audio output, including via HDMI.
When any of these components malfunction or are misconfigured, your HDMI connection can fail.
Basic Checks: The First Steps to Troubleshooting
Often, the fix for HDMI not working on Windows laptop is incredibly simple. Start with these fundamental checks.
Step 1: Check Physical Connections
- Reseat the Cables: Disconnect both ends of the HDMI cable (from your laptop and the external display) and plug them back in firmly. Ensure they are fully seated in their respective ports.
- Try a Different HDMI Port:
- On your external display, if it has multiple HDMI ports, try connecting the cable to a different one.
- Make sure the display’s input source is switched to the correct HDMI port (e.g., HDMI 1, HDMI 2). Use your display’s remote control or on-screen menu.
- Test a Different HDMI Cable: HDMI cables can go bad. If you have a spare, try using a different cable. A faulty cable is a very common reason for no signal.
- Test a Different Display: If possible, try connecting your laptop to a different HDMI-compatible display (another TV, monitor) to rule out issues with your primary display.
- Test a Different Device (Optional): Connect another device (e.g., a gaming console, a DVD player) to your external display using the same HDMI cable and port. This helps determine if the issue is with your display or the laptop.
Step 2: Restart Devices
- Restart Your Laptop: A simple reboot can often resolve temporary glitches.
- Power Cycle Your Display: Turn off your external display, unplug its power cable from the wall for about 30 seconds, then plug it back in and turn it on. This can reset the display’s HDMI handshake process.
Software and Settings Solutions
If the basic checks don’t resolve the issue, the problem might be with your Windows settings or drivers.
Step 3: Configure Display Settings in Windows
Windows might not be detecting or extending to the external display correctly.
- Access Display Settings:
- Press Windows key + P. This shortcut brings up the “Project” or “Project to a second screen” menu.
- Entity: The Windows key (often marked with the Windows logo) is a modifier key on most modern keyboards, used for various shortcuts and to access the Start Menu.
- Select a Display Mode: Choose one of the following options:
- Duplicate: Shows the same content on both your laptop and the external display.
- Extend: Extends your desktop across both displays, giving you more screen space.
- Second screen only: Shows content only on the external display (your laptop screen will be blank).
- PC screen only: Shows content only on your laptop (external display will be blank).
- Try selecting “Duplicate” or “Extend” first. If you choose “Second screen only” and your external display is still black, you won’t see anything!
- Manually Detect Displays:
- Right-click on an empty area of your desktop and select “Display settings.”
- Scroll down and click the “Detect” button (in Windows 10/11, it might be hidden, so try clicking “Identify” or scrolling to the bottom of the display settings).
- Sometimes, simply changing the resolution or refresh rate for the external display can resolve compatibility issues.
Step 4: Update or Reinstall Graphics Drivers
Outdated or corrupted graphics drivers are a very common cause of HDMI issues.
- Open Device Manager:
- Right-click the Start button (Windows icon) and select “Device Manager.”
- Entity: Device Manager is a component of the Microsoft Windows operating system that allows users to view and control the hardware attached to the computer. It provides information about installed drivers, allows updating drivers, enabling/disabling devices, and troubleshooting hardware issues.
- Expand Display Adapters: In Device Manager, expand the “Display adapters” section. You will likely see your integrated graphics (e.g., Intel Iris/UHD Graphics) and potentially a dedicated graphics card (e.g., NVIDIA GeForce, AMD Radeon).
- Update Driver:
- Right-click on each graphics adapter listed.
- Select “Update driver.”
- Choose “Search automatically for drivers.” Windows will try to find and install the latest driver.
- Reinstall Driver (if update fails):
- If updating doesn’t work, right-click the graphics adapter again.
- Select “Uninstall device.”
- Check the box “Attempt to remove the driver software for this device” (if available).
- Click “Uninstall.”
- Restart your laptop. Windows will typically reinstall a generic display driver upon reboot. Then, proceed to download the latest driver directly from your laptop manufacturer’s website or the graphics card manufacturer’s website (Intel, NVIDIA, AMD).
- Why reinstall? Sometimes, a corrupted driver cannot be fixed by an update; a clean reinstall is necessary.
Step 5: Check and Update Audio Drivers
Even if you’re only having video issues, the HDMI signal carries audio too, and sometimes an audio driver conflict can affect the entire connection.
- Open Device Manager: (Same as Step 4.1).
- Expand Sound, video and game controllers:
- Update/Reinstall HDMI Audio Driver: Look for an entry related to your HDMI audio (e.g., “Intel Display Audio,” “NVIDIA High Definition Audio,” “AMD High Definition Audio Device”).
- Right-click on it and select “Update driver.”
- If that doesn’t work, “Uninstall device” and restart your laptop to reinstall.
Step 6: Roll Back Graphics Driver
If the issue started after a recent driver update, rolling back might fix it.
- Open Device Manager: (Same as Step 4.1).
- Expand Display Adapters:
- Roll Back Driver:
- Right-click your graphics adapter.
- Select “Properties.”
- Go to the “Driver” tab.
- If the “Roll Back Driver” button is active, click it. Follow the prompts.
- Entity: A driver rollback is a process in which a previously installed software driver for a hardware device is replaced with an older version. This is typically done when a newly installed driver causes stability issues or malfunctions with the hardware.
Step 7: Disable and Re-enable Graphics Adapter
A quick toggle can sometimes re-establish communication.
- Open Device Manager: (Same as Step 4.1).
- Expand Display Adapters:
- Disable/Enable: Right-click on your graphics adapter and select “Disable device.” Confirm when prompted. Wait a few seconds, then right-click again and select “Enable device.”
Advanced Solutions
If the above methods haven’t worked, consider these more advanced steps.
Step 8: Check for Windows Updates
Windows updates often include driver updates and bug fixes that can resolve compatibility issues.
- Open Settings: Press Windows key + I.
- Go to “Windows Update” (Windows 11) or “Update & Security” > “Windows Update” (Windows 10).
- Check for updates: Install any pending updates and restart your laptop.
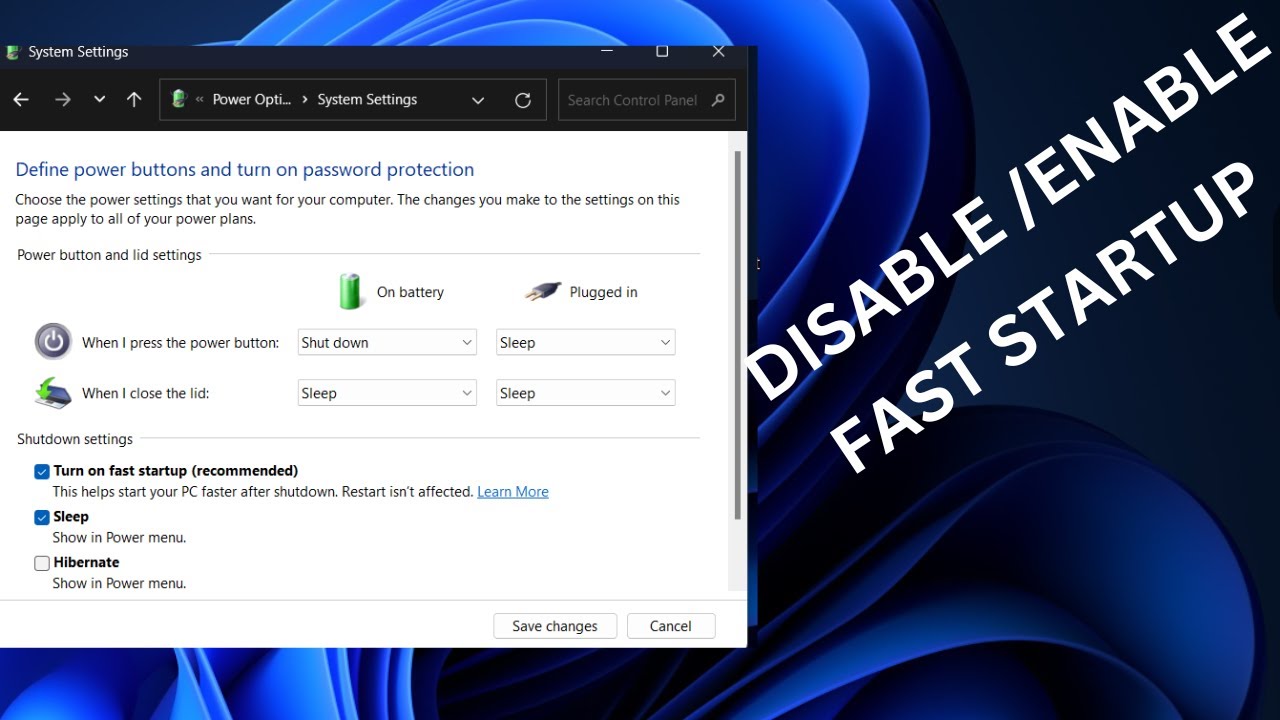
Step 9: Disable Fast Startup (Windows 10/11)
Sometimes, Fast Startup can interfere with hardware detection.
- Search for “Control Panel” in the Start Menu and open it.
- Go to “Hardware and Sound” > “Power Options.”
- Click “Choose what the power buttons do” (on the left pane).
- Click “Change settings that are currently unavailable.”
- Uncheck “Turn on fast startup (recommended).”
- Click “Save changes” and then restart your laptop fully.
Step 10: Check BIOS/UEFI Settings (Advanced Users)
In rare cases, specific settings in your laptop’s BIOS/UEFI might affect HDMI output, especially if you have a dedicated graphics card and integrated graphics. Look for options related to graphics output, display settings, or multi-monitor support. Proceed with caution as incorrect BIOS changes can cause system instability. Consult your laptop’s manual for specific instructions.
The Importance of Connectivity
The seamless operation of connections like HDMI is fundamental to modern computing. It represents the crucial link between your processing unit and your visual and auditory experience. When your HDMI not working on Windows laptop, it highlights the intricate dance between hardware, drivers, and operating system configurations. Understanding how to troubleshoot these connections empowers you to take control of your digital environment, ensuring that your devices work together harmoniously and that you can always enjoy your content on the screen of your choice.
Frequently Asked Questions (FAQ)
Q1: My HDMI works for video but not audio. How can I fix that?
- Check Default Playback Device: Right-click the speaker icon on your taskbar, go to “Sound settings” (or “More sound settings” on Windows 11 to open the classic Sound Control Panel). In the “Playback” tab, ensure your HDMI output (e.g., “Intel Display Audio,” “NVIDIA High Definition Audio”) is enabled and set as the “Default Device.”
- Update/Reinstall Audio Drivers: As mentioned in Step 5, update or reinstall the audio drivers associated with your HDMI output in Device Manager.
- Check Display/TV Audio Settings: Ensure your TV or monitor’s audio output is not muted or set to external speakers if you want sound from the display itself.
Q2: Why does my laptop screen go black when I connect HDMI?
This usually indicates that Windows has switched to “Second screen only” mode (Windows key + P) and the external display isn’t receiving a signal or is set to the wrong input.
- Press Windows key + P repeatedly to cycle through the display modes. You should eventually hit “Duplicate” or “Extend” and see your laptop screen again.
- Ensure your external display is powered on and set to the correct HDMI input.
- Try a different HDMI cable.
Q3: My HDMI port feels loose. Is that the problem?
A loose physical port can definitely be the problem. If the port is physically damaged, bent, or if the cable wiggles easily, it might be preventing a stable connection. In such cases, the port might need professional repair or replacement.
Q4: Can HDMI adapters or docking stations cause issues?
Yes, they can. While convenient, adapters (e.g., USB-C to HDMI, DisplayPort to HDMI) and docking stations introduce another link in the chain where issues can arise.
- Test the HDMI connection directly from your laptop to the display if possible.
- Ensure your adapter/docking station is of good quality and has updated firmware (if applicable).
- Try a different adapter/docking station if you suspect it’s faulty.
Q5: My HDMI connection worked fine yesterday, but not today. What changed?
Even if it worked before, common culprits for sudden failure include:
- Loose Cable: A cable that was slightly disturbed.
- Recent Software/Driver Update: A Windows update or graphics driver update might have introduced a bug. Try rolling back drivers (Step 6).
- Display Settings Reset: Sometimes display settings can revert. Check Windows key + P (Step 3).
- Power Cycle: Your laptop or display might be stuck in a strange state. Perform a full power cycle (Step 2).
Q6: What is HDCP, and could it cause HDMI issues?
HDCP (High-bandwidth Digital Content Protection) is a copy protection scheme used on HDMI connections to prevent unauthorized copying of copyrighted material. If there’s an HDCP handshake failure between your laptop and the display, you might see a blank screen or an error message. This is more common with certain content (e.g., Blu-ray playback, streaming services) and less so with general desktop use. Ensuring all your drivers are up-to-date and using certified HDMI cables can help mitigate HDCP issues.