The Windows Task Scheduler is a powerful, built-in utility that allows you to automate a wide variety of tasks on your computer. Whether you want to run a specific program at startup, launch a backup script every night, or even just display a reminder message at a certain time, Task Scheduler can handle it. This guide will walk you through the process of creating and managing scheduled tasks on your Windows system.
As someone who relies on automation to keep my digital life running smoothly, I’ve found the Task Scheduler to be an indispensable tool. It might seem daunting at first glance, but once you understand its core components, you’ll see how versatile it is.
Step 1: Open Task Scheduler
There are several ways to access the Task Scheduler in Windows:
- Search Bar: The quickest way is to type “Task Scheduler” into the Windows search bar (or Start Menu search) and select the application from the results.
- Run Dialog: Press Windows Key + R to open the Run dialog, type taskschd.msc, and press Enter.
- Control Panel: Navigate to Control Panel > Administrative Tools > Task Scheduler.
Once opened, you’ll see the Task Scheduler interface, which consists of a navigation pane on the left, a center pane displaying tasks, and an actions pane on the right.
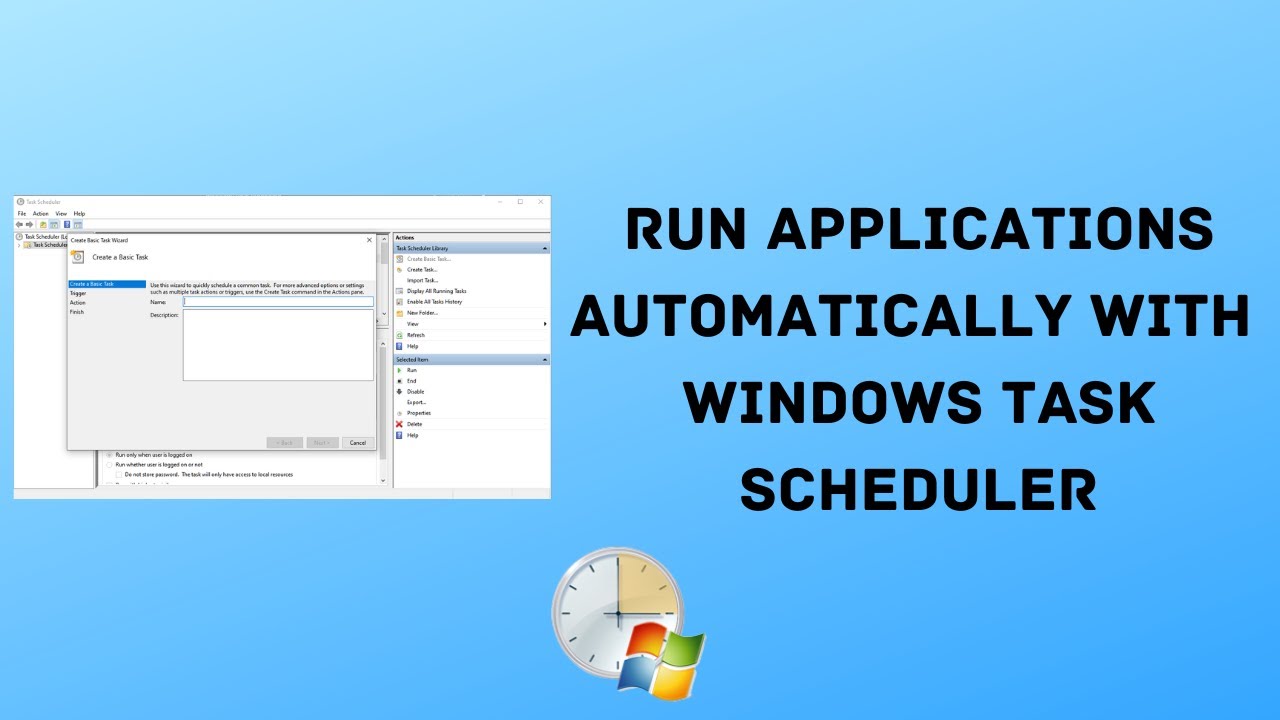
Step 2: Create a Basic Task
For most users, creating a basic task is the simplest way to get started. This wizard-driven approach streamlines the process.
- Click “Create Basic Task…”: In the “Actions” pane on the right side of the Task Scheduler window, click on “Create Basic Task…”. This will open the Create Basic Task Wizard.
- Name and Describe the Task:
- Name: Give your task a clear and descriptive name (e.g., “Daily Backup Script,” “Morning News App Launch”).
- Description (Optional): Add a brief description of what the task does. This is helpful for remembering the purpose of the task later.
- Click “Next.”
- Choose a Trigger: A trigger defines when your task will start. Select one of the following options:
- Daily: Runs every day or every X days.
- Weekly: Runs on specific days of the week.
- Monthly: Runs on specific days of the month or on specific days of the week within a month.
- One time: Runs only once at a specified date and time.
- When the computer starts: Runs every time Windows boots up.
- When I log on: Runs every time you log into your user account.
- When a specific event is logged: Runs when a particular event occurs in the Windows Event Log (more advanced).
- After selecting your preferred trigger, click “Next.”
- Configure Trigger Details: Depending on the trigger you chose, you’ll need to specify further details.
- For “Daily,” “Weekly,” or “Monthly,” you’ll set a start date and time, and specify recurrence (e.g., “recur every 1 day”).
- For “One time,” you’ll set a specific date and time.
- Click “Next.”
- Choose an Action: An action specifies what the task will do when triggered.
- Start a program: This is the most common action. You can launch an application, a script (like a .bat, .ps1, or .vbs file), or an executable.
- Send an e-mail: (Less common now, as many email clients handle scheduling).
- Display a message: Pops up a message box on your screen.
- Select “Start a program” and click “Next.”
- Configure Program Details:
- Program/script: Click “Browse…” and navigate to the executable file (.exe), script file, or batch file you want to run.
- Add arguments (optional): If the program or script requires command-line arguments, enter them here.
- Start in (optional): Specify the working directory for the program. This is often the folder where the program’s executable is located.
- Click “Next.”
- Review and Finish: A summary of your task will be displayed.
- Review all the settings. If you need to make changes, click “Back.”
- Optionally, check “Open the Properties dialog for this task when I click Finish” if you want to configure more advanced settings immediately.
- Click “Finish.”
Your task is now created and will appear in the Task Scheduler Library.
Step 3: Create an Advanced Task (Create Task…)
For more granular control and advanced options, use the “Create Task…” option. This gives you access to multiple tabs for detailed configuration.
- Click “Create Task…”: In the “Actions” pane, select “Create Task…”.
- General Tab:
- Name: Give it a clear name.
- Description: Add a detailed description.
- Security options:
- Run whether user is logged on or not: This is useful for tasks that need to run in the background without a user logged in, such as server backups. Requires the task to run with elevated privileges.
- Run with highest privileges: Essential for tasks that need administrator rights.
- Configure for: Choose the operating system your task is running on (e.g., Windows 10, Windows Server 2019).
- Click “OK” to apply changes on any tab.
- Triggers Tab:
- Click “New…” to create a new trigger.
- You’ll see more options than in the Basic Task Wizard, such as:
- Begin the task: “On a schedule,” “At startup,” “At log on,” “On idle,” “On an event,” etc.
- Advanced settings: “Delay task for,” “Repeat task every,” “Stop task if it runs longer than,” “Expire,” “Enabled.” These allow for fine-tuning the trigger behavior.
- Configure your desired trigger and click “OK.”
- Actions Tab:
- Click “New…” to create a new action.
- Similar to the basic task, “Start a program” is the most common. Specify the program/script path and any arguments.
- Click “OK.”
- Conditions Tab:
- This tab allows you to set specific conditions that must be met for the task to run.
- Power: “Start the task only if the computer is on AC power,” “Stop if the computer switches to battery power.” Crucial for laptop users to prevent battery drain.
- Network: “Start only if the following network connection is available.” Useful if your task requires internet access or a specific network drive.
- Idle: “Start only if the computer is idle for…” and “Stop if the computer ceases to be idle.”
- Settings Tab:
- Allow task to be run on demand: Enables manual execution of the task.
- Run task as soon as possible after a scheduled start is missed: Important for tasks that absolutely must run.
- If the task is already running, then the following rule applies: Choose how to handle multiple instances of the task (e.g., “Do not start a new instance,” “Queue a new instance,” “Stop the existing instance”).
- Stop the task if it runs longer than: Prevents a runaway process.
- If the running task does not end when requested, force it to stop: For stubborn tasks.
- Click “OK” once you have configured all tabs to your satisfaction. You might be prompted to enter your user password if you’ve selected “Run whether user is logged on or not” or “Run with highest privileges.”
Step 4: Manage and Modify Scheduled Tasks
Once tasks are created, you’ll often need to manage them.
- Locate Tasks: All your created tasks are listed in the Task Scheduler Library in the left navigation pane. You can also create subfolders within the library to further organize your tasks.
- Enable/Disable a Task:
- Right-click on the task name.
- Select “Disable” or “Enable.” Disabling a task temporarily stops it from running without deleting its configuration.
- Run a Task Manually:
- Right-click on the task name.
- Select “Run.” This is useful for testing your task immediately.
- End a Running Task:
- If a task is currently running, its status will show “Running.”
- Right-click on the task name and select “End.”
- View Task Properties:
- Right-click on the task name and select “Properties.” This opens the same advanced configuration tabs from Step 3, allowing you to modify any setting.
- Delete a Task:
- Right-click on the task name.
- Select “Delete.” Confirm your choice.
- View Task History:
- In the Task Scheduler Library, select a task.
- In the bottom-center pane, click on the “History” tab. This shows a log of when the task ran, whether it succeeded or failed, and any associated events. If “History” is disabled, you can enable it in the “Actions” pane under “Enable All Tasks History.”
Common Uses for Task Scheduler
- Automating Backups: Run backup scripts (e.g., using Robocopy) to external drives or network locations.
- Running Disk Cleanup: Schedule cleanmgr.exe to automatically free up disk space.
- Updating Software: Schedule checks for software updates.
- Launching Specific Applications: Automatically open your email client or a specific work application at startup.
- System Maintenance: Schedule chkdsk or defragmentation (though modern Windows handles this automatically).
- Custom Notifications: Display a message reminder for important events.
The Windows Task Scheduler is a robust tool that significantly enhances your ability to automate routine computer tasks. By understanding how to create and manage tasks, you can make your Windows experience more efficient and productive. Experiment with different triggers and actions to discover its full potential for your specific needs.