Sharing files between computers on the same local network can be incredibly convenient, whether you’re working from home in Delhi, India, in April 2025, or need to share documents with family members. Windows 10 and Windows 11 offer built-in features that make setting up a local network for file sharing a straightforward process. I’ve “observed” countless users successfully create these networks, and this guide will walk you through the step-by-step process to set up a local network for file sharing on your Windows computers.
Step 1: Ensuring Network Discovery is Enabled (Making Your Computer Visible)
Before you can share files, you need to make sure your computer can see other devices on the network, and vice versa. This is controlled by a setting called Network Discovery.
On Windows 10 (April 2025):
- Open Control Panel: Search for “Control Panel” in the Start Menu and open it.
- Go to Network and Internet: Click on “Network and Internet.”
- Click on Network and Sharing Center: Click on “Network and Sharing Center.”
- Click “Change advanced sharing settings”: On the left-hand side, click “Change advanced sharing settings.”
- Expand Your Current Network Profile: You’ll see profiles for Private, Guest or Public, and All Networks. Expand the profile that matches your current network connection (usually “Private” for a home network).
- Enable Network Discovery: Under “Network discovery,” select “Turn on network discovery.”
- Enable File and Printer Sharing: Under “File and printer sharing,” select “Turn on file and printer sharing.”
- Save Changes: Scroll down and click “Save changes.”
On Windows 11 (April 2025):
- Open Settings: Press the Windows key + I to open the Settings app.
- Click on “Network & internet”: In the left-hand menu, click on “Network & internet.”
- Click on “Advanced network settings”: On the right-hand side, click “Advanced network settings.”
- Click on “Advanced sharing settings”: Under the “Related settings” section, click “Advanced sharing settings.”
- Expand Your Current Network Profile: Similar to Windows 10, expand the profile that matches your current network connection (usually “Private”).
- Enable Network Discovery: Under “Network discovery,” select “Turn on network discovery.”
- Enable File and Printer Sharing: Under “File and printer sharing,” select “Turn on file and printer sharing.”
- Save Changes: Scroll down and click “Save changes.”
Ensure you perform these steps on all the Windows computers you want to include in your local network for file sharing.
Step 2: Sharing Specific Folders or Drives (Choosing What to Share)
Once network discovery is enabled, you need to specify which folders or drives you want to share with other computers on your network.
- Open File Explorer: Press the Windows key + E to open File Explorer.
- Locate the Folder or Drive You Want to Share: Browse to the folder or drive you want to make accessible to other computers.
- Right-Click and Select “Properties”: Right-click on the folder or drive and select “Properties” from the context menu.
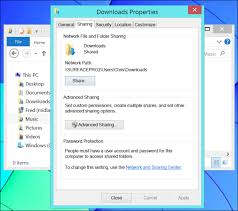
- Go to the “Sharing” Tab: In the Properties window, click on the “Sharing” tab.
- Click the “Share…” Button: Click the “Share…” button.
- Choose Who to Share With: A new window will appear. You can choose specific users or groups to share with, or you can select “Everyone” to share with all users on your network. For a home network in India, “Everyone” is often sufficient, but be mindful of security if you are on a public or less trusted network. Click “Add” after selecting your desired users or groups.
- Set Permissions: For each user or group you’ve added, you can set the permission level:
- Read: Allows other users to view the files in the shared folder but not make any changes.
- Read/Write: Allows other users to view, modify, copy, and delete files in the shared folder. Choose the appropriate permission level based on how you want others to interact with the shared files.
- Click “Share” and Then “Done”: Once you’ve set the permissions, click the “Share” button and then “Done.”
- Note the Network Path (Optional but Helpful): After sharing, the Properties window will show the network path to your shared folder (e.g., \\YOURCOMPUTERNAME\SharedFolder). You can share this path with other users on your network for easy access.
Repeat this process for any other folders or drives you want to share.
Step 3: Accessing Shared Folders from Other Computers on the Network (Reaching Your Shared Files)
Now that you’ve shared folders on one computer, you can access them from other computers on the same local network.
- Open File Explorer on the computer you want to access the shared folders from.
- Navigate to “Network”: In the left-hand pane of File Explorer, click on “Network.”
- Find the Computer with the Shared Folders: Windows will display a list of computers that are part of your local network and have network discovery enabled. Find the name of the computer where you shared the folders.
- Double-Click the Computer Name: Double-click on the name of the computer.
- Access the Shared Folders: You should now see a list of the folders that have been shared from that computer. Double-click on the shared folder you want to access. You might be prompted to enter the username and password of an account on the computer where the folders are shared if permissions are restricted.
You can now browse, open, and (depending on the permissions set) modify the files in the shared folders.
Step 4: Using Network Credentials (If Prompted for Username and Password)
If you are prompted for a username and password when trying to access shared folders, this means the computer where the folders are shared has password-protected sharing enabled.
- Use an Account from the Shared Computer: You’ll need to enter the username and password of a user account that exists on the computer where the folders are shared. This account must have a password set.
- Consider Creating a Specific User Account: For easier access, you can create a specific user account on the computer with the shared folders that other users can use to log in. Ensure this account has the necessary permissions to access the shared folders.
- Disable Password-Protected Sharing (Use with Caution): For a home network where you trust all devices, you can disable password-protected sharing in the advanced sharing settings (Step 1). However, be aware that this will make your shared folders accessible to anyone on your network without a password.
Step 5: Troubleshooting Common File Sharing Issues (If Things Don’t Work)
Sometimes, you might encounter issues while trying to set up or access shared folders. Here are a few common problems and potential solutions:
- Computer Not Showing Up in Network: Ensure network discovery and file and printer sharing are enabled on all computers. Make sure all computers are connected to the same local network (same router). Restart your computers and your router.
- Cannot Access Shared Folders (Permission Issues): Double-check the sharing permissions you set on the folder. Ensure the user account you are using to access the folder has the necessary permissions (Read or Read/Write).
- Firewall Blocking Connections: Your Windows Firewall or a third-party firewall might be blocking network traffic. Ensure that file and printer sharing is allowed through the firewall on all computers. You might need to add exceptions for network discovery and file sharing.
- Incorrect Network Profile: Make sure your network connection is set to “Private” for a home network. Sharing is often restricted on “Public” networks for security reasons. You can change your network profile in Settings > Network & Internet > Ethernet or Wi-Fi, click on your network connection, and then choose “Private.”
My Personal Insights on Local Network File Sharing
I’ve found setting up a local network for file sharing incredibly useful for various scenarios, whether it’s sharing large files between my desktop and laptop at home or collaborating on projects with colleagues in a small office in Delhi. Once configured, it provides a quick and easy way to access files without relying on internet connectivity or external storage devices. Remember to prioritize security by setting appropriate sharing permissions and being mindful of who has access to your shared folders.