Losing important files or having your system crash can be a digital nightmare. I’ve personally experienced the panic of a malfunctioning computer, and I can tell you that having a reliable backup and restore point can be a lifesaver. Fortunately, Windows 10 and Windows 11, as of April 2025, offer built-in tools to help you protect your data and system settings. This guide will walk you through the step-by-step process of creating both backups and restore points on both operating systems, ensuring you’re prepared for the unexpected.
Step 1: Understanding the Difference: Backups vs. Restore Points
Before we begin, let’s clarify the difference between a system image backup and a system restore point:
- System Image Backup: This creates an exact copy (an image) of your entire computer, including the operating system, installed programs, files, and settings. If your hard drive fails or your system becomes severely corrupted, you can use this image to restore your computer to its exact state at the time the backup was created. This is a comprehensive solution for complete system recovery.
- System Restore Point: This takes a “snapshot” of your system files, registry settings, and hardware drivers at a specific point in time. It doesn’t back up your personal files. If you encounter problems after installing new software or drivers, you can use a restore point to revert your system back to a previous working state without affecting your documents, photos, or videos. This is useful for undoing system changes.
Both methods are valuable and serve different purposes in protecting your digital life in April 2025.
Step 2: Creating a System Image Backup in Windows 10 (April 2025)
While Microsoft recommends using third-party backup solutions, the built-in system image tool is still available in Windows 10.
- Connect an External Drive: You’ll need an external hard drive or a large USB drive with enough free space to hold the system image. Ensure it’s connected to your computer.
- Open Control Panel: Search for “Control Panel” in the Start Menu and open it.
- Go to System and Security: Click on “System and Security.”
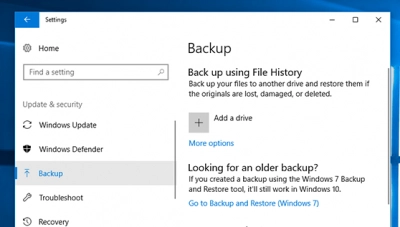
- Click on Backup and Restore (Windows 7): Yes, you read that right. The tool is still labeled this way. Click on it.
- Click “Create a system image”: On the left-hand side, click on “Create a system image.”
- Choose Where to Save Your Backup: Select your connected external drive as the location to save the backup. Click “Next.”
- Confirm What to Back Up: By default, your system partitions will be selected. You can choose to include additional drives if you wish. Click “Next.”
- Review Your Settings: Double-check the settings to ensure they are correct. Click “Start backup.”
- Wait for the Backup to Complete: The backup process might take some time depending on the size of your data. Once it’s finished, you’ll be prompted to create a system repair disc (optional but recommended). Follow the on-screen instructions.
- Store Your Backup Safely: Keep your external drive containing the system image in a safe place.
Step 3: Creating a System Image Backup in Windows 11 (April 2025)
The process is slightly different in Windows 11, but the underlying tool is the same.
- Connect an External Drive: As with Windows 10, connect an external hard drive or a large USB drive.
- Open Control Panel: Search for “Control Panel” in the Start Menu and open it.
- Go to System and Security: Click on “System and Security.”
- Click on Backup and Restore (Windows 7): Again, the same label. Click on it.
- Click “Create a system image”: On the left-hand side, click on “Create a system image.”
- Follow Steps 6-10 from the Windows 10 instructions above. The process is identical from this point.
Step 4: Creating a System Restore Point in Windows 10 (April 2025)
Creating a restore point is a quick way to safeguard your system settings.
- Search for “Create a restore point” in the Start Menu and open it.
- Configure Protection (If Necessary): In the System Properties window, under the “System Protection” tab, you’ll see a list of available drives. If the “Protection” for your system drive (usually C:) says “Off,” click on it and then click “Configure…” Select “Turn on system protection” and adjust the “Max Usage” slider to allocate some disk space for restore points. Click “Apply” and “OK.”
- Click “Create…”: Back in the “System Protection” tab, with your system drive selected, click the “Create…” button.
- Name Your Restore Point: Enter a descriptive name for the restore point (e.g., “Before installing new software” or “April 1st Update”). Click “Create.”
- Wait for the Restore Point to be Created: This process usually takes a few minutes. Once it’s done, click “Close” and “OK.”
Step 5: Creating a System Restore Point in Windows 11 (April 2025)
The process for creating a system restore point is similar in Windows 11.
- Search for “Create a restore point” in the Start Menu and open it.
- Configure Protection (If Necessary): In the System Properties window, under the “System Protection” tab, check if system protection is turned on for your system drive. If not, follow the configuration steps from the Windows 10 instructions above.
- Click “Create…”: With system protection enabled, click the “Create…” button.
- Name Your Restore Point: Enter a descriptive name for the restore point and click “Create.”
- Wait for the Restore Point to be Created: Once the process is complete, click “Close” and “OK.”
Step 6: Restoring Your System from a System Image Backup (Windows 10 & 11 – April 2025)
If you need to restore your computer from a system image backup, you’ll need to boot into the Windows Recovery Environment.
- Boot from Recovery Media or Advanced Startup: You can use a system repair disc created earlier or access the Advanced Startup options through the Settings menu (Search for “Advanced startup” in the Start Menu).
- Navigate to Troubleshoot: In the recovery environment, go to “Troubleshoot.”
- Select “System Image Recovery”: Click on “System Image Recovery.”
- Choose Your Backup: Select the system image backup you want to restore from. You might need to connect the external drive containing the backup.
- Follow the On-Screen Instructions: The recovery process will guide you through the steps to restore your entire system from the selected image. This will overwrite everything on your system drive.
Step 7: Restoring Your System Using a System Restore Point (Windows 10 & 11 – April 2025)
If you created a restore point, you can use it to revert your system to a previous state.
- Search for “Create a restore point” in the Start Menu and open it.
- Click “System Restore…” in the System Properties window.
- Choose a Restore Point: Click “Next.” You’ll see a list of available restore points. Select the one you want to use (ideally the most recent one created before you encountered the issue). You can click “Scan for affected programs” to see which programs will be affected by the restore. Click “Next.”
- Confirm Your Restore Point: Review your selection and click “Finish.”
- Wait for the System Restore to Complete: Your computer will restart and the system restore process will begin. Do not interrupt this process. Once it’s finished, your system will be restored to the state it was in when the restore point was created.
My Personal Experience with Backups and Restore Points (April 2025)
Over the years, I’ve learned that regularly creating system image backups and restore points is one of the best investments you can make in protecting your digital data and ensuring system stability. I’ve personally recovered from critical system failures thanks to having a recent system image backup. Restore points have also saved me from headaches after installing incompatible software or drivers. Make it a habit to create these regularly – you’ll thank yourself later!