Monitoring CPU and RAM usage in Windows is essential for understanding how your computer is performing. High CPU or memory usage can cause system slowdowns, application crashes, or overheating. Knowing how to check system resource usage helps you troubleshoot issues, identify performance bottlenecks, and keep your PC running smoothly.
This guide will walk you through several methods to check your CPU usage and RAM usage in Windows 10 and 11. I’ve personally used these methods across various devices—from high-end desktops to low-power laptops—and will share practical tips to help you get the most out of your system.
Why Monitor CPU and RAM Usage?
Here are a few common reasons you might want to keep an eye on resource usage:
- Your computer is running slow or freezing
- Apps are crashing or not responding
- You suspect a background process is using too much CPU or memory
- You’re checking system capacity before installing new software or games
- You’re troubleshooting thermal issues or fan noise
Windows includes several built-in tools for checking resource usage. Let’s go through each method step by step.
Method 1: Use Task Manager
Task Manager is the most accessible tool for checking CPU and RAM usage in real-time.
Step 1: Open Task Manager
You can open Task Manager in multiple ways:
- Press Ctrl + Shift + Esc
- Right-click on the taskbar and select Task Manager
- Press Ctrl + Alt + Delete and choose Task Manager
If it opens in compact view, click More details at the bottom.
Step 2: Monitor CPU and Memory Usage
Once you’re in the full Task Manager view:
- Click on the Processes tab.
- You’ll see a list of all running apps and background processes.
- Under the CPU column, you can see how much processor power each process is using (in percentage).
- Under the Memory column, you can view RAM usage (in MB or percentage).
You can sort columns to see which programs are using the most resources.
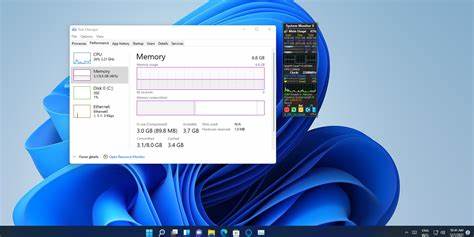
Step 3: View System-Wide Usage
- Switch to the Performance tab.
- Click CPU to view:
- Usage percentage
- Number of cores and threads
- Processor speed and uptime
- Click Memory to view:
- Total installed RAM
- Amount in use
- Available memory
- Memory speed and slot information
This section gives a clearer snapshot of how your CPU and RAM are performing over time.
Method 2: Use Resource Monitor
Resource Monitor offers a more detailed view than Task Manager and is useful for advanced monitoring.
Step 1: Open Resource Monitor
- Press Windows + R, type resmon, and press Enter
- Or open Task Manager > Performance tab > Open Resource Monitor (at the bottom)
Step 2: Monitor CPU Usage
- Click the CPU tab.
- You’ll see a live graph of CPU usage for all cores.
- Below, the Processes section shows each process’s CPU activity.
- Use the Average CPU column to identify long-running processes that consume the most power.
Step 3: Monitor Memory Usage
- Click the Memory tab.
- You’ll see a bar graph showing memory usage:
- Hardware Reserved
- In Use
- Modified
- Standby
- Free
- Scroll down to see a list of processes and how much RAM each one is using.
This tool is especially helpful when troubleshooting a memory leak or figuring out which applications are hogging RAM.
Method 3: Use Performance Monitor (Advanced Users)
Performance Monitor allows you to build custom tracking tools and logs for system performance over time.
Step 1: Open Performance Monitor
- Press Windows + R, type perfmon, and hit Enter
- In the left pane, expand Performance Monitor
Step 2: Add CPU and Memory Counters
- Click the green plus icon to add counters.
- From the list:
- Select Processor > % Processor Time (choose All instances).
- Select Memory > Available MBytes, Committed Bytes, and Cache Bytes.
- Click Add, then OK.
You’ll now see a graph tracking these parameters in real time.
This tool is ideal for long-term monitoring or diagnosing performance issues that occur intermittently.
Method 4: Use Windows Settings (Quick Overview)
If you want a quick summary:
- Open Settings with Windows + I
- Go to System > About
- Under Device specifications, you can see:
- Processor (CPU)
- Installed RAM
This doesn’t show usage, but helps identify hardware capacity.
Method 5: Use Command Prompt or PowerShell
These tools are text-based but useful if you’re scripting or need a fast check.
Check RAM usage:
Open Command Prompt or PowerShell and type:
mathematica
CopyEdit
systeminfo | findstr /C:”Total Physical Memory”
mathematica
CopyEdit
systeminfo | findstr /C:”Available Physical Memory”
Check CPU load:
Use PowerShell:
sql
CopyEdit
Get-CimInstance win32_processor | select LoadPercentage
This gives the current CPU load in percentage.
Tips to Troubleshoot High CPU or RAM Usage
If you’re seeing consistently high usage, here are steps I personally use to troubleshoot:
- Check for Background Apps
Some apps (like Chrome, OneDrive, or antivirus software) use a lot of resources even when idle. Disable non-essential apps from Task Manager > Startup.
- End Problematic Tasks
Use Task Manager to find processes using too much CPU or RAM. Right-click and choose End Task to temporarily stop them.
- Scan for Malware
Unusual CPU or RAM spikes may be caused by malicious software. Run a full scan using Windows Defender or a trusted antivirus tool.
- Update Software and Drivers
Outdated drivers or buggy apps can cause leaks or high resource usage. Update from Windows Update > Advanced Options > Optional Updates.
- Add More RAM
If your memory usage is constantly above 80% and your device allows upgrades, adding more RAM can significantly improve performance.
My Personal Experience
On my primary laptop, I regularly check Task Manager to monitor CPU spikes when working with heavy apps like video editors or large Excel files. I’ve noticed apps like Chrome can use over 2 GB of RAM with many tabs open.
By using Resource Monitor, I once diagnosed a memory leak caused by a misbehaving browser extension. Since then, it’s become a habit to check these tools whenever my system slows down unexpectedly.
Conclusion
Knowing how to check CPU and RAM usage in Windows gives you control over your system’s performance. Whether you’re troubleshooting a slowdown, monitoring resource usage while gaming, or just curious about what’s going on in the background, the built-in tools in Windows offer everything you need.