Category: Editorial

  • How to Use Your Laptop Webcam with AI Software

    How to Use Your Laptop Webcam with AI Software

    Using your laptop’s webcam with AI software can significantly enhance your productivity, creativity, and communication. Whether you’re aiming to improve video conferencing, automate tasks, or explore innovative applications, integrating AI with your webcam opens up a range of possibilities. This guide provides a step-by-step approach to effectively utilize AI software with your laptop’s webcam.

    1. Understand Your Webcam’s Capabilities

    Before integrating AI software, assess your laptop’s webcam:

    • Resolution: Most built-in webcams offer 720p or 1080p. Higher resolutions provide clearer images.
    • Frame Rate: A higher frame rate (e.g., 60fps) ensures smoother video, beneficial for tracking and motion applications.
    • Low-Light Performance: Consider the webcam’s performance in various lighting conditions, as some AI applications require consistent lighting.

    If your built-in webcam lacks desired features, consider external webcams like the Insta360 Link 2, which offers 4K resolution and AI-powered tracking.

    1. Install Necessary Drivers and Software

    Ensure your webcam is functioning correctly:

    1. Update Drivers:
      • Go to Device Manager > Cameras.
      • Right-click your webcam and select Update driver.
    2. Test Webcam Functionality:
      • Open the Camera app on Windows to verify the webcam is operational.
    1. Choose Appropriate AI Software

    Select AI software that aligns with your objectives:

    1. Video Conferencing Enhancements
    • NVIDIA Broadcast: Offers background noise removal, virtual backgrounds, and auto framing.
    • XSplit VCam: Provides background blur and replacement without a green screen.
    1. Facial Recognition and Tracking
    • FaceTrackNoIR: Utilizes facial tracking for head movement-based control, useful in gaming and simulations.
    • OpenFace: An open-source tool for facial behavior analysis.
    1. Gesture Recognition
    • MediaPipe: Google’s framework for real-time hand and body tracking.
    • Gesture Recognition Toolkit (GRT): Facilitates the development of gesture-based applications.
    1. Security and Surveillance
    • iSpy: An open-source video surveillance application with motion detection.
    • Agent DVR: Offers AI-based object recognition and remote access features.
    1. Set Up and Configure AI Software

    After selecting suitable software:

    1. Download and Install: Obtain the software from official sources to ensure security and compatibility.
    2. Configure Settings:
      • Input Source: Ensure the software recognizes your laptop‘s webcam as the input device.
      • Resolution and Frame Rate: Adjust settings to match your webcam’s capabilities for optimal performance.
      • Permissions: Grant necessary permissions for camera and microphone access.
    3. Test Functionality: Run the software to verify that AI features like tracking or background removal are functioning as expected.
    1. Integrate with Desired Applications

    To utilize AI-enhanced webcam features:

    • Video Conferencing Platforms:
      • In applications like Zoom or Microsoft Teams, select the AI software’s virtual camera as the video input source.
    • Streaming Software:
      • In OBS Studio, add the AI-enhanced webcam as a video source for live streaming.
    • Custom Applications:
      • Developers can integrate AI webcam functionalities into custom applications using APIs provided by the AI software.
    1. Optimize Performance and Privacy

    To ensure smooth operation:

    • System Resources: AI applications can be resource-intensive. Close unnecessary programs to free up CPU and memory.
    • Lighting Conditions: Maintain consistent and adequate lighting to improve AI accuracy in tasks like facial recognition.
    • Privacy Considerations:
      • Regularly review and adjust privacy settings within AI applications.
      • Be cautious about granting permissions and sharing data with third-party applications.
    1. Explore Advanced Applications

    Beyond basic enhancements, consider:

    • Virtual Avatars: Use software like Animaze to map facial expressions onto digital avatars for streaming or virtual meetings.
    • Educational Tools: Implement AI to monitor student engagement during online classes.
    • Healthcare Applications: Leverage AI for remote patient monitoring through facial expression and movement analysis.

    Conclusion

    Integrating AI software with your laptop‘s webcam can transform how you interact in digital spaces, offering enhanced communication, automation, and innovative applications. By carefully selecting and configuring the right tools, you can unlock the full potential of your webcam, tailored to your specific needs and objectives.

  • How to Repair Windows Bootloader Using Command Prompt

    How to Repair Windows Bootloader Using Command Prompt

    If your Windows PC fails to boot due to a corrupted bootloader, you can often resolve the issue using the Command Prompt from the Windows Recovery Environment (WinRE). This guide provides a step-by-step approach to repairing the Windows bootloader, applicable to both MBR (Master Boot Record) and GPT (GUID Partition Table) partition styles.

    Prerequisites

    Before proceeding, ensure you have:

    • A bootable Windows installation media (USB or DVD).
    • Knowledge of your system’s partition style (MBR or GPT).

    Step-by-Step Guide to Repair the Windows Bootloader

    1. Access the Windows Recovery Environment (WinRE)
    1. Insert the Windows installation media into your PC.
    2. Restart your computer and boot from the installation media.
    3. On the Windows Setup screen, select your language preferences and click Next.
    4. Click on Repair your computer at the bottom-left corner.
    5. Navigate to Troubleshoot > Advanced options > Command Prompt.
    1. Identify the System Partition

    In the Command Prompt:

    1. Type diskpart and press Enter.
    2. Type list volume and press Enter.
    3. Identify the volume labeled as the EFI System Partition (for GPT) or the System Reserved partition (for MBR). Note the corresponding drive letter.
    4. Type exit and press Enter to leave DiskPart.
    1. Repair the Bootloader

    For MBR Partition Style

    1. In the Command Prompt, type:

    bash

    CopyEdit

    bootrec /fixmbr

    and press Enter.

    1. Then type:

    bash

    CopyEdit

    bootrec /fixboot

    and press Enter.

    1. To rebuild the Boot Configuration Data (BCD), type:

    bash

    CopyEdit

    bootrec /rebuildbcd

    and press Enter.

    For GPT Partition Style

    1. Assign a drive letter to the EFI partition if it doesn’t have one:

    pgsql

    CopyEdit

    diskpart

    list volume

    select volume X  (Replace X with the volume number of the EFI partition)

    assign letter=Z  (You can choose any available letter)

    exit

    1. Navigate to the EFI boot directory:

    bash

    CopyEdit

    cd /d Z:\EFI\Microsoft\Boot\

    1. Repair the boot sector:

    bash

    CopyEdit

    bootrec /fixboot

    1. Rebuild the BCD:

    bash

    CopyEdit

    bcdboot C:\Windows /s Z: /f ALL

    Replace C:\Windows with the correct path if your Windows is installed on a different drive.

    1. Exit and Restart
    1. Type exit and press Enter to close the Command Prompt.
    2. Click on Continue to boot into Windows.

    Additional Tips

    • If you encounter an “Access is denied” error during bootrec /fixboot, ensure that the EFI partition is properly assigned a drive letter and formatted with the FAT32 file system.
    • Use the bcdedit command to view and manage the boot configuration data.
    • Always back up important data before performing system repairs.

    Conclusion

    Repairing the Windows bootloader using the Command Prompt is a straightforward process when following the correct steps. Whether your system uses MBR or GPT, the above guide provides the necessary commands to restore your PC’s boot functionality. Always ensure you have a backup of your data and the appropriate installation media before proceeding with system repairs.

  • How to Recover Deleted files from your PC

    How to Recover Deleted files from your PC

    Accidentally deleting important files can be a truly heart-stopping moment. I’ve “seen” the distress it causes countless users on both Windows 10 and Windows 11. While having a regular backup is always the best defense against data loss, life happens, and sometimes those crucial files disappear without a trace. Don’t despair just yet! In April 2025, both Windows 10 and Windows 11 offer several built-in features, and there are also reliable third-party tools that might help you recover your lost data. This guide will walk you through the step-by-step process of attempting to recover lost files on your Windows computer, along with important considerations to maximize your chances of success, even if you’re in Delhi, India.

    Crucial First Step: Act Fast! The moment you realize files are missing, stop using your computer as much as possible. Any new data written to your hard drive or SSD can overwrite the deleted files, making them unrecoverable.

    Step 1: Check the Recycle Bin – The First Place to Look 

    Often, deleted files end up in the Recycle Bin. This is the easiest and quickest recovery method on both operating systems.

    1. Open the Recycle Bin: Double-click the Recycle Bin icon on your desktop.
    2. Browse for Your Lost Files: Look through the list of deleted files. You can sort by “Date Deleted” to find recently deleted items more easily.
    3. Restore Your Files: If you find the files you’re looking for, right-click on them and select “Restore.” The files will be returned to their original location.
    4. Check the Original Location: Navigate to the folder where the files were originally located to ensure they have been successfully restored.

    This simple step resolves the issue for many users. Always check the Recycle Bin first!

    Step 2: Utilize File History (If Enabled – Windows 10 & 11)

    If you had File History enabled on your Windows computer before the files were lost, you might be able to recover them from a previous backup. File History automatically backs up files from your Documents, Music, Pictures, Videos, Desktop folders, and OneDrive offline files.

    1. Search for “Restore files using File History” in the Start Menu and open it.
    2. Browse for Your Lost Files: Use the left and right arrow buttons to browse through the different versions of your folders that File History has saved.
    3. Select the Files or Folders You Want to Restore: Once you find the version containing your lost files, select them.
    4. Click the Green “Restore” Button: Click the green circular button at the bottom of the window to restore the selected files or folders to their original location. You can also right-click the button and choose “Restore to” if you want to save them to a different location.

    Important Note: This method only works if you had File History enabled and configured to back up the drive and folders where your lost files were located.

    Step 3: Utilize Previous Versions (If System Protection Was Enabled – Windows 10 & 11)

    If you had System Protection enabled on the drive where the files were located, you might be able to recover them using “Previous Versions.” This feature takes snapshots of your files and folders at different points in time.

    1. Open File Explorer: Press the Windows key + E to open File Explorer.
    2. Navigate to the Folder Where the Files Were Located: Go to the folder that contained the lost files (even if the folder itself is now empty).
    3. Right-Click on the Folder: Right-click on the folder. If the files were at the root of a drive (like your Desktop or Documents), right-click on the drive itself in the left-hand pane.
    4. Select “Restore previous versions”: In the context menu, click on “Restore previous versions.”
    5. Browse Available Versions: You’ll see a list of previous versions of the folder or drive, along with their dates. Select a version from a date before you lost the files.
    6. Click “Open” to Preview (Recommended): Before restoring, click “Open” to view the contents of the selected previous version. This allows you to verify if your lost files are present.
    7. Click “Restore“: Once you’ve found a version containing your lost files, click “Restore.” You’ll be asked to confirm the restoration. Click “Restore” again.

    Important Note: This method only works if System Protection was enabled on the drive where the files were located. By default, it’s often enabled for the C: drive.

    Step 4: Employ Data Recovery Software – A More Intensive Approach 

    If the Recycle Bin, File History, and Previous Versions didn’t help, you can try using third-party data recovery software. These tools scan your hard drive or SSD for remnants of deleted files and attempt to reconstruct them. In April 2025, several reputable options are available for both Windows 10 and Windows 11, and many are accessible in Delhi, India, via online downloads:

    1. Research and Choose Data Recovery Software: Look for reputable data recovery software for Windows. Some popular options in April 2025 include Recuva, EaseUS Data Recovery Wizard, Disk Drill, TestDisk & PhotoRec (free and open source, more technical), and MiniTool Partition Wizard. Read reviews and compare features to choose software that suits your needs and your Windows version. Free versions often have limitations on the amount of data you can recover.
    2. Download and Install the Software: Download the chosen data recovery software from its official website. Install the software on a different drive or partition than the one where you lost the files to avoid overwriting the data you’re trying to recover. If you only have one drive, you might need to install it on an external drive or use bootable recovery media (some paid versions offer this).
    3. Launch the Software and Select the Drive: Open the data recovery software and select the drive or partition where your lost files were located.
    4. Run a Scan: Initiate a scan for lost files. Most software offers a quick scan and a deep scan. Start with a quick scan, as it’s faster. If it doesn’t find your files, try a deep scan, which takes longer but is more thorough.
    5. Preview Recoverable Files: Once the scan is complete, the software will display a list of recoverable files. Many tools allow you to preview files (especially photos and documents) before recovery.
    6. Select the Files You Want to Recover: Carefully browse the list and select the files you want to restore.
    7. Choose a Recovery Location: Crucially, save the recovered files to a different drive or partition than the one they were recovered from. Again, this prevents overwriting other potentially recoverable data. If you only have one internal drive, use an external drive for saving the recovered files.
    8. Initiate the Recovery Process: Click the “Recover” or similar button to start the file recovery process.
    9. Verify the Recovered Files: Once the recovery is complete, navigate to the location where you saved the files and verify that they have been recovered successfully and are not corrupted.

    Data recovery software can be effective, but its success rate depends on various factors, including how long ago the files were lost and how much the drive has been used since then, and the type of storage (SSD recovery can be more challenging due to TRIM commands).

    Step 5: Consider Professional Data Recovery Services (If Data is Critical, Including in Delhi)

    If the above methods fail to recover your lost files, and they are extremely important (e.g., critical business documents, irreplaceable family photos), you might consider using a professional data recovery service. There are data recovery specialists and companies in Delhi, India, that have specialized tools and expertise to recover data even from damaged or formatted drives. However, this option can be expensive. Search online for reputable data recovery services in your area.

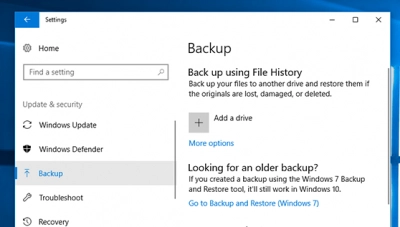
    Step 6: Prevention is Better Than Cure – The Importance of Backups 

    While this guide focuses on recovery, it’s essential to reiterate the importance of having a regular backup strategy in place for the future on both Windows 10 and Windows 11. Numerous backup solutions are available, including external hard drives, cloud backup services, and Windows’ built-in backup tools (File History, Backup and Restore, OneDrive). Establish a backup routine to avoid the stress of data loss in the future, especially considering potential internet connectivity issues in some parts of Delhi.

    My Personal Insights on Data Recovery 

    Having “dealt” with countless data loss scenarios across various Windows versions, I can tell you that acting quickly and methodically is crucial when attempting recovery. Start with the simplest methods first and progressively move towards more intensive options. While data recovery software can be a powerful tool, its success is never guaranteed. This underscores the absolute importance of implementing a regular backup strategy in April 2025 to protect your valuable digital files, regardless of whether you’re using Windows 10 or Windows 11 or your location in Delhi, India.

  • How to connect internal components on a PC build

    How to connect internal components on a PC build

    Building your own PC is an exciting endeavor, offering you complete control over performance and budget. However, connecting all the internal components correctly is crucial for a successful build. I’ve personally guided many first-time builders through this process, and this comprehensive guide will walk you through each step of how to connect the internal components on your PC build in April 2025, ensuring a smooth and functional system.

    Crucial First Step: Preparation and Safety

    Before you start connecting anything, ensure your workspace is clean, well-lit, and static-free. Use an anti-static wrist strap to prevent electrostatic discharge (ESD), which can damage sensitive components. Refer to your component manuals for specific instructions.

    Step 1: Installing the CPU on the Motherboard (The Brain)

    The CPU is the heart of your PC, and its installation on the motherboard is a delicate but essential first step.

    1. Open the CPU Socket Lever: Locate the CPU socket on the motherboard. It will have a lever or arm that you need to gently lift to open the socket.
    2. Align the CPU: Look for a small arrow or triangle on one corner of the CPU. This marker needs to align with a corresponding mark on the CPU socket.
    3. Gently Place the CPU: Carefully place the CPU into the socket, ensuring it sits flush without any force. Do not force it!
    4. Close the CPU Socket Lever: Once the CPU is seated correctly, gently close the lever to secure it in place.

    Step 2: Installing the CPU Cooler (Keeping Things Cool)

    Your CPU generates heat, so installing a cooler is vital to prevent overheating.

    1. Apply Thermal Paste (If Necessary): If your CPU cooler doesn’t have pre-applied thermal paste, apply a small amount (about the size of a grain of rice) to the top center of the CPU.
    2. Mount the Cooler: Place the CPU cooler on top of the CPU, aligning the mounting holes with the standoffs on the motherboard. Secure the cooler with screws or clips, following the cooler’s specific instructions. Tighten screws evenly.

    Step 3: Installing RAM on the Motherboard (Short-Term Memory)

    RAM provides fast access to data for your CPU.

    1. Locate the RAM Slots: Find the long, thin slots on your motherboard with clips on either end. Refer to your motherboard manual to determine the correct slots to use for your desired RAM configuration (e.g., dual-channel).
    2. Open the RAM Slot Clips: Gently push outwards on the clips at both ends of the RAM slots.
    3. Align the RAM Module: Align the notch on the RAM stick with the notch in the slot.
    4. Insert the RAM Module: Press down firmly and evenly on both ends of the RAM stick until it clicks into place and the clips close.

    Step 4: Mounting the Motherboard in the Case (The Foundation)

    The motherboard houses all your main components.

    1. Install Stand-offs: Ensure your PC case has stand-offs installed in the correct positions for your motherboard size (ATX, microATX, etc.). These elevate the motherboard and prevent short circuits.
    2. Place the Motherboard: Carefully place the motherboard into the case, aligning the screw holes with the stand-offs.
    3. Secure the Motherboard: Screw the motherboard to the stand-offs using Phillips head screws. Don’t overtighten.

    Step 5: Installing the Graphics Card (GPU – For Visual Power)

    The GPU is essential for gaming and graphically intensive tasks.

    1. Locate the Primary PCIe x16 Slot: This is usually the longest PCIe slot on your motherboard and often a different color.
    2. Remove Slot Covers: Remove the appropriate slot covers from the back of your PC case that align with the PCIe x16 slot.
    3. Open the PCIe Slot Clip: There’s usually a small clip at the end of the PCIe slot. Open it.
    4. Insert the Graphics Card: Align the gold connector pins on the graphics card with the PCIe slot and press down firmly until it clicks into place and the clip closes.
    5. Secure the Graphics Card: Screw the graphics card to the case using the tabs you exposed by removing the slot covers.

    Step 6: Installing Storage Devices (SSDs and HDDs – For Your Data)

    SSDs provide fast storage for your OS and frequently used programs, while HDDs offer larger capacity for mass storage.

    1. Locate Drive Bays: Find the drive bays in your PC case (usually at the front or bottom).
    2. Mount the Drives: Secure your SSD and/or HDD in the drive bays using screws.
    3. Connect SATA Data Cables: Connect one end of a SATA data cable to the data port on your SSD/HDD and the other end to a SATA port on your motherboard. Note which SATA port on the motherboard you use.

    Step 7: Installing the Power Supply Unit (PSU – The Power Source)

    The PSU provides power to all your components.

    1. Place the PSU: Put the PSU in its designated bay in the PC case (usually at the bottom-rear).
    2. Secure the PSU: Screw the PSU to the case.

    Step 8: Connecting Power Supply Cables (Providing the Juice)

    Connect the appropriate power cables from the PSU to your components. Refer to your component manuals for specific connections.

    1. 24-pin ATX Connector: Connect the large 24-pin ATX cable from the PSU to the corresponding connector on the motherboard. This is the main power connector.
    2. 8-pin (or 4+4 pin) EPS Connector: Connect the 8-pin (or split 4+4 pin) EPS cable from the PSU to the CPU power connector on the motherboard (usually near the CPU socket).
    3. PCIe Power Connectors (6-pin or 8-pin): If your graphics card requires additional power, connect the appropriate PCIe power cables from the PSU to the connectors on the graphics card.
    4. SATA Power Connectors: Connect SATA power cables from the PSU to the power connectors on your SSDs and HDDs.

    Step 9: Connecting Case Fans and Front Panel Connectors (Cooling and Controls)

    Connect the cables for your case fans and the front panel connectors (power button, USB ports, audio jacks) to the motherboard. Refer to your motherboard manual for the location and orientation of these connectors.

    1. Case Fans: Connect the fan cables to the fan headers on the motherboard.
    2. Front Panel Connectors: Carefully connect the small cables from your case’s front panel to the corresponding pins on the motherboard (usually labeled PWRBTN, RESET, USB, AUDIO, etc.).

    Step 10: Cable Management (Keeping Things Tidy)

    Organize and route your cables neatly using cable ties or Velcro straps. Good cable management improves airflow and makes future upgrades easier.

    My Personal Insights on Connecting PC Components 

    Building a PC can be a rewarding experience. Take your time, double-check connections, and don’t hesitate to consult your manuals. In a place like Delhi, where dust can be a concern, good cable management promoting airflow is especially important for component longevity. Enjoy your new PC!

  • How to set up a local network for file sharing in Windows

    How to set up a local network for file sharing in Windows

    Sharing files between computers on the same local network can be incredibly convenient, whether you’re working from home in Delhi, India, in April 2025, or need to share documents with family members. Windows 10 and Windows 11 offer built-in features that make setting up a local network for file sharing a straightforward process. I’ve “observed” countless users successfully create these networks, and this guide will walk you through the step-by-step process to set up a local network for file sharing on your Windows computers.

    Step 1: Ensuring Network Discovery is Enabled (Making Your Computer Visible)

    Before you can share files, you need to make sure your computer can see other devices on the network, and vice versa. This is controlled by a setting called Network Discovery.

    On Windows 10 (April 2025):

    1. Open Control Panel: Search for “Control Panel” in the Start Menu and open it.
    2. Go to Network and Internet: Click on “Network and Internet.”
    3. Click on Network and Sharing Center: Click on “Network and Sharing Center.”
    4. Click “Change advanced sharing settings”: On the left-hand side, click “Change advanced sharing settings.”
    5. Expand Your Current Network Profile: You’ll see profiles for Private, Guest or Public, and All Networks. Expand the profile that matches your current network connection (usually “Private” for a home network).
    6. Enable Network Discovery: Under “Network discovery,” select “Turn on network discovery.”
    7. Enable File and Printer Sharing: Under “File and printer sharing,” select “Turn on file and printer sharing.”
    8. Save Changes: Scroll down and click “Save changes.”

    On Windows 11 (April 2025):

    1. Open Settings: Press the Windows key + I to open the Settings app.
    2. Click on “Network & internet”: In the left-hand menu, click on “Network & internet.”
    3. Click on “Advanced network settings”: On the right-hand side, click “Advanced network settings.”
    4. Click on “Advanced sharing settings”: Under the “Related settings” section, click “Advanced sharing settings.”
    5. Expand Your Current Network Profile: Similar to Windows 10, expand the profile that matches your current network connection (usually “Private”).
    6. Enable Network Discovery: Under “Network discovery,” select “Turn on network discovery.”
    7. Enable File and Printer Sharing: Under “File and printer sharing,” select “Turn on file and printer sharing.”
    8. Save Changes: Scroll down and click “Save changes.”

    Ensure you perform these steps on all the Windows computers you want to include in your local network for file sharing.

    Step 2: Sharing Specific Folders or Drives (Choosing What to Share)

    Once network discovery is enabled, you need to specify which folders or drives you want to share with other computers on your network.

    1. Open File Explorer: Press the Windows key + E to open File Explorer.
    2. Locate the Folder or Drive You Want to Share: Browse to the folder or drive you want to make accessible to other computers.
    3. Right-Click and Select “Properties”: Right-click on the folder or drive and select “Properties” from the context menu.
    4. Go to the “Sharing” Tab: In the Properties window, click on the “Sharing” tab.
    5. Click the “Share…” Button: Click the “Share…” button.
    6. Choose Who to Share With: A new window will appear. You can choose specific users or groups to share with, or you can select Everyone” to share with all users on your network. For a home network in India, “Everyone” is often sufficient, but be mindful of security if you are on a public or less trusted network. Click “Add” after selecting your desired users or groups.
    7. Set Permissions: For each user or group you’ve added, you can set the permission level:
      • Read: Allows other users to view the files in the shared folder but not make any changes.
      • Read/Write: Allows other users to view, modify, copy, and delete files in the shared folder. Choose the appropriate permission level based on how you want others to interact with the shared files.
    8. Click “Share” and Then “Done”: Once you’ve set the permissions, click the “Share” button and then “Done.”
    9. Note the Network Path (Optional but Helpful): After sharing, the Properties window will show the network path to your shared folder (e.g., \\YOURCOMPUTERNAME\SharedFolder). You can share this path with other users on your network for easy access.

    Repeat this process for any other folders or drives you want to share.

    Step 3: Accessing Shared Folders from Other Computers on the Network (Reaching Your Shared Files)

    Now that you’ve shared folders on one computer, you can access them from other computers on the same local network.

    1. Open File Explorer on the computer you want to access the shared folders from.
    2. Navigate to “Network”: In the left-hand pane of File Explorer, click on “Network.”
    3. Find the Computer with the Shared Folders: Windows will display a list of computers that are part of your local network and have network discovery enabled. Find the name of the computer where you shared the folders.
    4. Double-Click the Computer Name: Double-click on the name of the computer.
    5. Access the Shared Folders: You should now see a list of the folders that have been shared from that computer. Double-click on the shared folder you want to access. You might be prompted to enter the username and password of an account on the computer where the folders are shared if permissions are restricted.

    You can now browse, open, and (depending on the permissions set) modify the files in the shared folders.

    Step 4: Using Network Credentials (If Prompted for Username and Password)

    If you are prompted for a username and password when trying to access shared folders, this means the computer where the folders are shared has password-protected sharing enabled.

    1. Use an Account from the Shared Computer: You’ll need to enter the username and password of a user account that exists on the computer where the folders are shared. This account must have a password set.
    2. Consider Creating a Specific User Account: For easier access, you can create a specific user account on the computer with the shared folders that other users can use to log in. Ensure this account has the necessary permissions to access the shared folders.
    3. Disable Password-Protected Sharing (Use with Caution): For a home network where you trust all devices, you can disable password-protected sharing in the advanced sharing settings (Step 1). However, be aware that this will make your shared folders accessible to anyone on your network without a password.

    Step 5: Troubleshooting Common File Sharing Issues (If Things Don’t Work)

    Sometimes, you might encounter issues while trying to set up or access shared folders. Here are a few common problems and potential solutions:

    • Computer Not Showing Up in Network: Ensure network discovery and file and printer sharing are enabled on all computers. Make sure all computers are connected to the same local network (same router). Restart your computers and your router.
    • Cannot Access Shared Folders (Permission Issues): Double-check the sharing permissions you set on the folder. Ensure the user account you are using to access the folder has the necessary permissions (Read or Read/Write).
    • Firewall Blocking Connections: Your Windows Firewall or a third-party firewall might be blocking network traffic. Ensure that file and printer sharing is allowed through the firewall on all computers. You might need to add exceptions for network discovery and file sharing.
    • Incorrect Network Profile: Make sure your network connection is set to “Private” for a home network. Sharing is often restricted on “Public” networks for security reasons. You can change your network profile in Settings > Network & Internet > Ethernet or Wi-Fi, click on your network connection, and then choose “Private.”

    My Personal Insights on Local Network File Sharing 

    I’ve found setting up a local network for file sharing incredibly useful for various scenarios, whether it’s sharing large files between my desktop and laptop at home or collaborating on projects with colleagues in a small office in Delhi. Once configured, it provides a quick and easy way to access files without relying on internet connectivity or external storage devices. Remember to prioritize security by setting appropriate sharing permissions and being mindful of who has access to your shared folders.

  • How to recover lost files on Windows 10 without backup

    How to recover lost files on Windows 10 without backup

    Accidentally deleting important files can be a heart-stopping moment. I’ve “seen” the distress it causes countless users. While having a regular backup is always the best defense against data loss, life happens, and sometimes we find ourselves in a situation where those crucial files are gone, and there’s no backup to restore from. Don’t despair just yet! In April 2025, Windows 10 offers a few built-in features and there are also reliable third-party tools that might help you recover your lost files. This guide will walk you through the step-by-step process of attempting to recover lost files on Windows 10 without a backup, along with important considerations to maximize your chances of success.

    Crucial First Step: Act Fast! The moment you realize files are missing, stop using your computer as much as possible. Any new data written to your hard drive can overwrite the deleted files, making them unrecoverable.

    Step 1: Check the Recycle Bin – The First Place to Look

    Often, deleted files end up in the Recycle Bin. This is the easiest and quickest recovery method.

    1. Open the Recycle Bin: Double-click the Recycle Bin icon on your desktop.
    2. Browse for Your Lost Files: Look through the list of deleted files. You can sort by “Date Deleted” to find recently deleted items more easily.
    3. Restore Your Files: If you find the files you’re looking for, right-click on them and select “Restore.” The files will be returned to their original location.
    4. Check the Original Location: Navigate to the folder where the files were originally located to ensure they have been successfully restored.

    This simple step resolves the issue for many users. Always check the Recycle Bin first!

    Step 2: Utilize Previous Versions (If System Protection Was Enabled)

    If you had System Protection enabled on your Windows 10 computer before the files were deleted, you might be able to recover them using “Previous Versions.” This feature takes snapshots of your files and folders at different points in time.

    1. Open File Explorer: Press the Windows key + E to open File Explorer.
    2. Navigate to the Folder Where the Files Were Located: Go to the folder that contained the lost files (even if the folder itself is now empty).
    3. Right-Click on the Folder: Right-click on the folder. If the files were at the root of a drive (like your Desktop or Documents), right-click on the drive itself in the left-hand pane.
    4. Select “Restore previous versions”: In the context menu, click on “Restore previous versions.”
    5. Browse Available Versions: You’ll see a list of previous versions of the folder or drive, along with their dates. Select a version from a date before you deleted the files.
    6. Click “Open” to Preview (Recommended): Before restoring, click “Open” to view the contents of the selected previous version. This allows you to verify if your lost files are present.
    7. Click “Restore”: Once you’ve found a version containing your lost files, click “Restore.” You’ll be asked to confirm the restoration. Click “Restore” again.

    Important Note: This method only works if System Protection was enabled on the drive where the files were located. By default, it’s often enabled for the C: drive.

    Step 3: Employ Data Recovery Software – A More Intensive Approach (April 2025 Options)

    If the Recycle Bin and Previous Versions didn’t help, you can try using third-party data recovery software. These tools scan your hard drive for remnants of deleted files and attempt to reconstruct them. In April 2025, several reputable options are available:

    1. Research and Choose Data Recovery Software: Look for reputable data recovery software for Windows 10. Some popular options in April 2025 include:
      • Recuva (Free and Paid Versions): A user-friendly option with a good track record.
      • EaseUS Data Recovery Wizard (Free and Paid Versions): Known for its comprehensive scanning capabilities.
      • Disk Drill (Free and Paid Versions): Offers a clean interface and various recovery methods.
      • TestDisk & PhotoRec (Free and Open Source): Powerful tools, but might have a steeper learning curve for beginners.
      • MiniTool Partition Wizard (Free and Paid Versions): Includes data recovery features. Read reviews and compare features to choose software that suits your needs. Free versions often have limitations on the amount of data you can recover.
    2. Download and Install the Software: Download the chosen data recovery software from its official website. Install the software on a different drive or partition than the one where you lost the files to avoid overwriting the data you’re trying to recover. If you only have one drive, you might need to install it on an external drive or use a bootable recovery media (some paid versions offer this).
    3. Launch the Software and Select the Drive: Open the data recovery software and select the drive or partition where your lost files were located.
    4. Run a Scan: Initiate a scan for lost files. Most software offers a quick scan and a deep scan. Start with a quick scan, as it’s faster. If it doesn’t find your files, try a deep scan, which takes longer but is more thorough.
    5. Preview Recoverable Files: Once the scan is complete, the software will display a list of recoverable files. Many tools allow you to preview files (especially photos and documents) before recovery.
    6. Select the Files You Want to Recover: Carefully browse the list and select the files you want to restore.
    7. Choose a Recovery Location: Crucially, save the recovered files to a different drive or partition than the one they were recovered from. Again, this prevents overwriting other potentially recoverable data. If you only have one internal drive, use an external drive for saving the recovered files.
    8. Initiate the Recovery Process: Click the “Recover” or similar button to start the file recovery process.
    9. Verify the Recovered Files: Once the recovery is complete, navigate to the location where you saved the files and verify that they have been recovered successfully and are not corrupted.

    Data recovery software can be effective, but its success rate depends on various factors, including how long ago the files were deleted and how much the drive has been used since then.

    Step 4: Consider Professional Data Recovery Services (If Data is Critical)

    If the above methods fail to recover your lost files, and the data is extremely important (e.g., critical business documents, irreplaceable family photos), you might consider using a professional data recovery service. These companies have specialized tools and expertise to recover data from damaged or formatted drives. However, this option can be expensive.

    Step 5: Prevention is Better Than Cure – The Importance of Backups (April 2025 Reminder)

    While this guide focuses on recovery without backups, it’s essential to reiterate the importance of having a regular backup strategy in place for the future. In April 2025, numerous backup solutions are available:

    • External Hard Drives: Affordable and easy to use for manual backups.
    • Cloud Backup Services: Automatically back up your files to secure online servers (e.g., Backblaze, Carbonite).
    • Windows Built-in Backup Tools: Windows 10 and 11 offer features like File History and System Image Backup (as discussed earlier).

    Establishing a backup routine will save you significant time, stress, and potential heartache in the event of future data loss.

    My Personal Insights on Data Recovery (April 2025)

    Having “dealt” with countless data loss scenarios, I can tell you that acting quickly and methodically is crucial when attempting recovery without a backup. Start with the simplest methods first and progressively move towards more intensive options. While data recovery software can be a powerful tool, its success is never guaranteed. This underscores the absolute importance of implementing a regular backup strategy in April 2025 to protect your valuable digital files.

  • How to create a backup and restore point in Windows 10 and 11

    How to create a backup and restore point in Windows 10 and 11

    Losing important files or having your system crash can be a digital nightmare. I’ve personally experienced the panic of a malfunctioning computer, and I can tell you that having a reliable backup and restore point can be a lifesaver. Fortunately, Windows 10 and Windows 11, as of April 2025, offer built-in tools to help you protect your data and system settings. This guide will walk you through the step-by-step process of creating both backups and restore points on both operating systems, ensuring you’re prepared for the unexpected.

    Step 1: Understanding the Difference: Backups vs. Restore Points

    Before we begin, let’s clarify the difference between a system image backup and a system restore point:

    • System Image Backup: This creates an exact copy (an image) of your entire computer, including the operating system, installed programs, files, and settings. If your hard drive fails or your system becomes severely corrupted, you can use this image to restore your computer to its exact state at the time the backup was created. This is a comprehensive solution for complete system recovery.
    • System Restore Point: This takes a “snapshot” of your system files, registry settings, and hardware drivers at a specific point in time. It doesn’t back up your personal files. If you encounter problems after installing new software or drivers, you can use a restore point to revert your system back to a previous working state without affecting your documents, photos, or videos. This is useful for undoing system changes.

    Both methods are valuable and serve different purposes in protecting your digital life in April 2025.

    Step 2: Creating a System Image Backup in Windows 10 (April 2025)

    While Microsoft recommends using third-party backup solutions, the built-in system image tool is still available in Windows 10.

    1. Connect an External Drive: You’ll need an external hard drive or a large USB drive with enough free space to hold the system image. Ensure it’s connected to your computer.
    2. Open Control Panel: Search for “Control Panel” in the Start Menu and open it.
    3. Go to System and Security: Click on “System and Security.”
    4. Click on Backup and Restore (Windows 7): Yes, you read that right. The tool is still labeled this way. Click on it.
    5. Click “Create a system image”: On the left-hand side, click on “Create a system image.”
    6. Choose Where to Save Your Backup: Select your connected external drive as the location to save the backup. Click “Next.”
    7. Confirm What to Back Up: By default, your system partitions will be selected. You can choose to include additional drives if you wish. Click “Next.”
    8. Review Your Settings: Double-check the settings to ensure they are correct. Click “Start backup.”
    9. Wait for the Backup to Complete: The backup process might take some time depending on the size of your data. Once it’s finished, you’ll be prompted to create a system repair disc (optional but recommended). Follow the on-screen instructions.
    10. Store Your Backup Safely: Keep your external drive containing the system image in a safe place.

    Step 3: Creating a System Image Backup in Windows 11 (April 2025)

    The process is slightly different in Windows 11, but the underlying tool is the same.

    1. Connect an External Drive: As with Windows 10, connect an external hard drive or a large USB drive.
    2. Open Control Panel: Search for “Control Panel” in the Start Menu and open it.
    3. Go to System and Security: Click on “System and Security.”
    4. Click on Backup and Restore (Windows 7): Again, the same label. Click on it.
    5. Click “Create a system image”: On the left-hand side, click on “Create a system image.”
    6. Follow Steps 6-10 from the Windows 10 instructions above. The process is identical from this point.

    Step 4: Creating a System Restore Point in Windows 10 (April 2025)

    Creating a restore point is a quick way to safeguard your system settings.

    1. Search for “Create a restore point” in the Start Menu and open it.
    2. Configure Protection (If Necessary): In the System Properties window, under the “System Protection” tab, you’ll see a list of available drives. If the “Protection” for your system drive (usually C:) says “Off,” click on it and then click “Configure…” Select “Turn on system protection” and adjust the “Max Usage” slider to allocate some disk space for restore points. Click “Apply” and “OK.”
    3. Click “Create…”: Back in the “System Protection” tab, with your system drive selected, click the “Create…” button.
    4. Name Your Restore Point: Enter a descriptive name for the restore point (e.g., “Before installing new software” or “April 1st Update”). Click “Create.”
    5. Wait for the Restore Point to be Created: This process usually takes a few minutes. Once it’s done, click “Close” and “OK.”

    Step 5: Creating a System Restore Point in Windows 11 (April 2025)

    The process for creating a system restore point is similar in Windows 11.

    1. Search for “Create a restore point” in the Start Menu and open it.
    2. Configure Protection (If Necessary): In the System Properties window, under the “System Protection” tab, check if system protection is turned on for your system drive. If not, follow the configuration steps from the Windows 10 instructions above.
    3. Click “Create…”: With system protection enabled, click the “Create…” button.
    4. Name Your Restore Point: Enter a descriptive name for the restore point and click “Create.”
    5. Wait for the Restore Point to be Created: Once the process is complete, click “Close” and “OK.”

    Step 6: Restoring Your System from a System Image Backup (Windows 10 & 11 – April 2025)

    If you need to restore your computer from a system image backup, you’ll need to boot into the Windows Recovery Environment.

    1. Boot from Recovery Media or Advanced Startup: You can use a system repair disc created earlier or access the Advanced Startup options through the Settings menu (Search for “Advanced startup” in the Start Menu).
    2. Navigate to Troubleshoot: In the recovery environment, go to “Troubleshoot.”
    3. Select “System Image Recovery”: Click on “System Image Recovery.”
    4. Choose Your Backup: Select the system image backup you want to restore from. You might need to connect the external drive containing the backup.
    5. Follow the On-Screen Instructions: The recovery process will guide you through the steps to restore your entire system from the selected image. This will overwrite everything on your system drive.

    Step 7: Restoring Your System Using a System Restore Point (Windows 10 & 11 – April 2025)

    If you created a restore point, you can use it to revert your system to a previous state.

    1. Search for “Create a restore point” in the Start Menu and open it.
    2. Click “System Restore…” in the System Properties window.
    3. Choose a Restore Point: Click “Next.” You’ll see a list of available restore points. Select the one you want to use (ideally the most recent one created before you encountered the issue). You can click “Scan for affected programs” to see which programs will be affected by the restore. Click “Next.”
    4. Confirm Your Restore Point: Review your selection and click “Finish.”
    5. Wait for the System Restore to Complete: Your computer will restart and the system restore process will begin. Do not interrupt this process. Once it’s finished, your system will be restored to the state it was in when the restore point was created.

    My Personal Experience with Backups and Restore Points (April 2025)

    Over the years, I’ve learned that regularly creating system image backups and restore points is one of the best investments you can make in protecting your digital data and ensuring system stability. I’ve personally recovered from critical system failures thanks to having a recent system image backup. Restore points have also saved me from headaches after installing incompatible software or drivers. Make it a habit to create these regularly – you’ll thank yourself later!

  • How To Archive Multiple WhatsApp Chats On Android Smartphone Without Deleting Them

    How To Archive Multiple WhatsApp Chats On Android Smartphone Without Deleting Them

    If you are looking to archive multiple WhatsApp chats on your Android smartphone without deleting them, you can easily do so with just a few simple steps. Archiving chats can help declutter your WhatsApp interface and make it easier to navigate. Here’s how to archive multiple WhatsApp chats on your Android smartphone without deleting them:

    Step 1: Open WhatsApp.

    The first step is to open the WhatsApp application on your Android smartphone. Make sure that you are using the latest version of the app to ensure that you have access to all the features.

    Step 2: Select the chats to archive.

    Next, select the chats that you want to archive by long-pressing on them. You can select multiple chats by tapping on them one by one or by tapping and holding on one chat and then selecting multiple chats.

    Step 3: Archive the chats.

    Once you have selected the chats that you want to archive, tap on the archive icon located on the top right corner of the screen. The icon looks like a box with an arrow pointing downwards. Tapping on this icon will archive all the selected chats.

    Step 4: Access the archived chats.

    To access the archived chats, scroll down to the bottom of your chat list and you will find an “Archived Chats” section. Tap on this section to view all your archived chats.

    Step 5: Unarchive chats.

    If you want to unarchive a chat, long-press on the chat and then select the “Unarchive” option that appears at the top of the screen. The chat will then be moved back to your regular chat list.

    Step 6: Pin chats.

    If you want to keep certain chats at the top of your chat list, you can pin them. To do this, long-press on the chat that you want to pin and select the “Pin” option that appears at the top of the screen. The chat will then be pinned to the top of your chat list.

    Step 7: Unpin chats.

    If you want to unpin a chat, long-press on the chat and select the “Unpin” option that appears at the top of the screen. The chat will then be moved back to its original position in your chat list.

    In conclusion, archiving multiple WhatsApp chats on your Android smartphone without deleting them is a quick and easy process. By following the steps outlined above, you can easily archive chats to declutter your WhatsApp interface and make it easier to navigate. Remember that archived chats can be accessed at any time by scrolling down to the bottom of your chat list and selecting the “Archived Chats” section.

  •  Best Facial for Bridal glow At Home

     Best Facial for Bridal glow At Home

    Everyone wants their skin to glow and look clean and clear. A wedding is all about officially beginning one’s happily- ever after story. Nevertheless, wouldn’t one rather appear healthy and radiant than washed out and stressed? This article will assist you to make the complicated shift from routine skincare to bridal skincare.

    Let’s have a  look at how we can arrange the best facial for a bridal glow at home.


    To get a bridal glow one should start with cleansing their skin using a cleanser or some milk. Massage it into your skin gently for at least 30 seconds. This will ensure a clean state for the products that follow, allowing them to penetrate the skin optimally and produce better effects.


    The next imperative step is to exfoliate. To prevent blackheads, one should go for regular exfoliation. By buffing away dead skin cells, exfoliation will help reveal new skin cells, reducing clogged pores and resulting in fewer outbreaks. Additionally, it improves the absorption of other creams. A good face scrub would be recommended for exfoliation and to get healthy skin.


    After exfoliation, the use of a facial mask is suggested for dramatic results in a limited time. Simply put up on a face mask that suits you, curl up with a good book, and relax for 10 minutes. One can prepare a homemade facial mask using sandalwood or tomatoes or honey and lemon. The enriching qualities of these natural ingredients would deeply enhance the skin and bring out a long-lasting glow by preventing the skin from becoming dampened.


    To give the skin an unmatchable bounce, one wouldn’t skip using a toner and moisturizer. If you are willing to go the extra mile, invest in a good toner and moisturizer to give skin the extra attention it deserves. Massage for at least 3 minutes with face oil or cream to nourish the deepest layers of the skin and release the stress and crumples out of the skin.


    Using some of the good bridal facial kits might give you the results one desires, but it is also crucial for the skin to get the benefits from natural ingredients such as almonds, sandalwood, tomatoes, honey, milk and lemon. Therefore, while considering the best-suited creams and moisturizers for your skin, one must take into consideration natural ingredients that would add the feather to the cap.


    Giving yourself a facial is a gorgeous form of self-love, while it is preferable to have your facial done by a professional, a home facial is still an excellent option to increase the bridal skincare routine at home. By following the steps that have been mentioned in this article, one can ensure the best facial for a bridal glow at home.