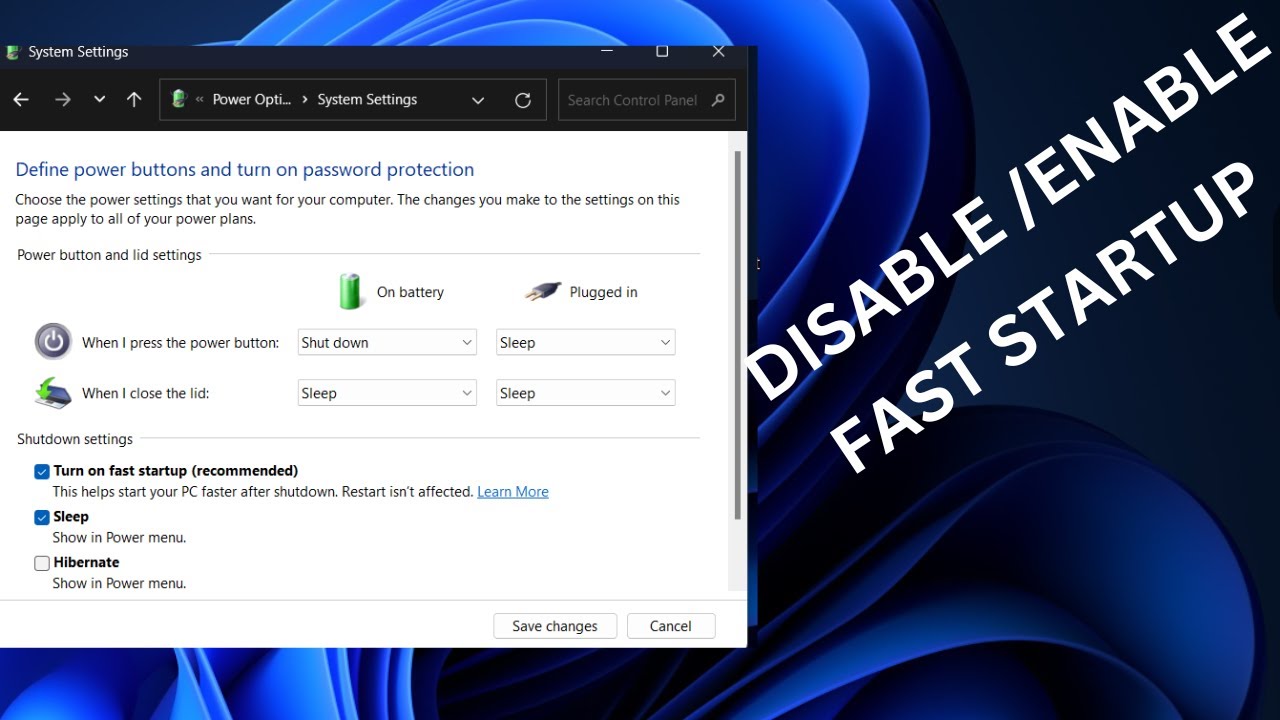
Category: Editorial

  • How to Disable Fast Startup in Windows

    How to Disable Fast Startup in Windows

    Fast Startup, also known as Hybrid Boot, is a feature first introduced in Windows 8 and carried over to Windows 10 and Windows 11. Its primary purpose is to make your computer boot up faster after a shutdown. Instead of performing a complete full shutdown (or “cold boot”), Fast Startup saves a small hibernation file that includes the Windows kernel session. This allows the system to resume quickly when you power it back on, similar to waking from hibernation, but with the user session closed.

    While designed for speed, Fast Startup can sometimes cause various problems. Common issues include:

    • Incomplete shutdowns: Your computer might not fully power off, leading to fans spinning or lights staying on.
    • Driver issues: Certain drivers might not re-initialize correctly upon boot, leading to problems with peripherals, audio, or network connections.
    • Dual-boot conflicts: If you’re dual-booting Windows with another operating system like Linux, Fast Startup can cause issues with file system access or prevent the other OS from mounting Windows partitions.
    • Preventing full system updates: Some system updates or changes require a complete shutdown and restart to apply properly, which Fast Startup bypasses.
    • External hardware detection: Issues with external hard drives or other peripherals not being detected after a boot.

    If you’re experiencing any of these issues, disabling Fast Startup is a common troubleshooting step. Here’s how to do it.

    Method 1: Using Power Options (Recommended and Easiest)

    This is the most straightforward way to disable Fast Startup on any Windows 10 or Windows 11 PC.

    1. Open Control Panel:
      • Click the Start button (Windows icon) or the Search icon on your taskbar.
      • Type “Control Panel” and click on the result.
    2. Navigate to Power Options:
      • In the Control Panel, change the “View by” option (top-right corner) to “Large icons” or “Small icons” if it’s set to “Category.”
      • Click on “Power Options.”
    3. Choose Power Button Actions:
      • In the left-hand pane of the Power Options window, click on “Choose what the power buttons do.”
    4. Access Hidden Shutdown Settings:
      • You’ll see a section titled “Shutdown settings” at the bottom. Notice that the “Turn on fast startup (recommended)” option is likely grayed out and cannot be changed directly.
      • To enable changes, click on “Change settings that are currently unavailable.” You may need to provide administrator privileges if prompted by User Account Control (UAC).
    5. Disable Fast Startup:
      • Now, the “Turn on fast startup (recommended)” checkbox should be clickable.
      • Uncheck the box next to “Turn on fast startup (recommended).”
    6. Save Changes:
      • Click “Save changes.”
    7. Restart Your PC: For the change to take full effect, you must perform a full restart (not a shutdown and then power on). Click Start > Power > Restart.

    From now on, when you shut down your computer, it will perform a complete full shutdown, which might take a few seconds longer but can resolve the issues caused by Fast Startup.

    Method 2: Using the Command Prompt (For Advanced Users)

    You can also disable Fast Startup using a simple command in an elevated Command Prompt. This method achieves the same result as Method 1.

    1. Open Command Prompt as Administrator:
      • Click the Start button or the Search icon on your taskbar.
      • Type “cmd” or “Command Prompt.”
      • Right-click on “Command Prompt” from the search results.
      • Select “Run as administrator.”
      • Confirm the User Account Control (UAC) prompt if it appears.
    2. Enter the Command:
      • In the Administrator: Command Prompt window, type the following command and press Enter:

    DOS

    powercfg /h off

      • This command disables the hibernation feature completely, which is a prerequisite for Fast Startup. Disabling hibernation automatically disables Fast Startup.
    1. Verify (Optional):
      • You can go back to Control Panel > Power Options > Choose what the power buttons do to confirm that “Turn on fast startup” is now unchecked and grayed out.
    2. Restart Your PC: Perform a full restart (Start > Power > Restart) for the changes to take effect.

    Re-enabling Fast Startup (If You Change Your Mind)

    If you find that disabling Fast Startup doesn’t solve your problem, or if you prefer the faster boot times, you can easily re-enable it.

    Using Power Options:

    1. Follow Steps 1-4 from Method 1 to reach the “Shutdown settings” in Power Options.
    2. Check the box next to “Turn on fast startup (recommended).”
    3. Click “Save changes” and then Restart your PC.

    Using Command Prompt:

    1. Open Command Prompt as Administrator (as in Method 2, Step 1).
    2. Type the following command and press Enter:

    DOS

    powercfg /h on

    1. This command re-enables hibernation. You then need to go to Control Panel > Power Options > Choose what the power buttons do, click “Change settings that are currently unavailable,” and check the “Turn on fast startup (recommended)” box, then click “Save changes.”
    2. Restart your PC.

    Disabling Fast Startup is a simple and often effective troubleshooting step for various Windows issues. While it might add a few seconds to your boot time, the increased stability and proper system behavior often make it a worthwhile trade-off, especially for users who frequently encounter hardware or software glitches after resuming from a “shutdown.”

    Frequently Asked Questions (FAQ)

    Q1: What is Fast Startup in Windows, and why would I want to disable

    Fast Startup is a feature in Windows 8, Windows 10, and Windows 11 that aims to speed up boot times. Instead of a full shutdown, it performs a hybrid shutdown where the Windows operating system saves a small hibernation file containing the kernel state. You might want to disable it if you experience:

    • Issues with your computer not fully shutting down.
    • Problems with drivers or peripherals not working correctly after startup.
    • Conflicts when dual-booting with other operating systems (like Linux).
    • Windows updates not fully applying.

    Q2: Will disabling Fast Startup delete any of my files or data?

    No, disabling Fast Startup will not delete any of your files, programs, or personal data. It only changes how your Windows operating system handles the shutdown and boot process. The only difference you might notice is a slightly longer startup time, as the system will perform a full cold boot rather than resuming from a partial hibernation state.

    Q3: Is disabling Fast Startup the same as disabling hibernation?

    Not exactly, but they are closely related. Fast Startup relies on a modified form of hibernation. If you disable hibernation completely (using powercfg /h off in Command Prompt), Fast Startup will also be automatically disabled because it can’t function without the hibernation capability. However, you can disable Fast Startup in Power Options without necessarily disabling the entire hibernation feature (though the system still won’t use that partial hibernation file for Fast Startup).

    Q4: My “Turn on fast startup” option is grayed out. How do I enable it?

    If the “Turn on fast startup (recommended)” option is grayed out, it means you need to click the “Change settings that are currently unavailable” link at the top of the “Shutdown settings” section in Power Options. This requires Administrator Privileges to proceed. Once clicked, the option should become editable. If it’s still grayed out, it might indicate that hibernation is already disabled system-wide (e.g., via the powercfg /h off command).

    Q5: Will disabling Fast Startup impact my laptop’s battery life while it’s off?

    No, disabling Fast Startup will not impact your laptop’s battery life while it’s completely off. When your laptop is fully shut down (which is what happens when Fast Startup is disabled), it consumes virtually no power. Fast Startup is about the boot process, not battery drain during powered-off states. If your laptop is still losing battery while “off,” you might have other issues like improper shutdown or a faulty battery.

  • How to Disable Webcam in Windows Permanently

    How to Disable Webcam in Windows Permanently

    In today’s digital age, the webcam has become an indispensable tool for communication, from video calls with family to remote work meetings. However, the presence of a built-in camera also raises significant privacy concerns. Cases of webcam hacking (known as camfecting), where malicious software or unauthorized individuals gain control of your webcam without your knowledge, are a real threat. These compromises can lead to unauthorized surveillance, blackmail, or data theft.

    For users who prioritize privacy and only use an external webcam when absolutely necessary, or for those concerned about potential exploits, disabling the built-in webcam permanently offers peace of mind. While Windows provides granular controls over which applications can access your camera, completely disabling it at a system level or physically blocking it offers the strongest safeguards against unauthorized access.

    The concern over webcam privacy isn’t new. Early webcams, often external peripherals, could simply be unplugged. With the rise of integrated webcams in laptops, the debate shifted to software controls and physical covers. High-profile incidents involving compromised webcams have only heightened awareness, leading to features like activity indicator lights and stricter operating system permissions in Microsoft Windows to give users more control over their visual privacy.

    How to Disable Your Webcam in Windows Permanently

    Permanently disabling your webcam in Windows involves a combination of software and, for ultimate security, physical methods. We’ll explore the most effective ways to achieve this.

    Method 1: Disable in Device Manager (Software-Based Disabling)

    Disabling your webcam in Device Manager tells Windows to effectively “turn off” the hardware component. This is reversible.

    Step 1: Open Device Manager

    • Action:
      • Press Windows key + X to open the Quick Link menu.
      • Select Device Manager.
      • Alternatively, search for “Device Manager” in the Start menu and open it.

    Step 2: Locate Your Webcam

    • Action: In the Device Manager window, expand the category labeled “Cameras” or “Imaging devices.”
    • You should see your built-in webcam listed (e.g., “Integrated Webcam,” “HP Webcam,” “Lenovo EasyCamera,” “USB Camera”).
    • Action: If you have multiple devices listed, identify the correct one. If unsure, right-click and choose “Properties” to view details.

    Step 3: Disable the Webcam Device

    • Action: Right-click on your webcam device.
    • Select “Disable device.”
    • Action: A warning message will appear, stating that disabling the device will stop it from functioning. Click “Yes” to confirm.
    • Action: The webcam entry will now have a small down arrow icon next to it, indicating it’s disabled.
    • Action: Restart your PC to ensure the changes take full effect.

    How to Re-enable (if needed): Follow the same steps, but right-click on the disabled webcam and select “Enable device.”

    Method 2: Adjust Camera Privacy Settings (App-Specific Control)

    While not a full “permanent disable” of the hardware, these settings prevent applications from accessing your camera. This is an important layer of security, even if you’ve disabled the camera in Device Manager.

    Step 1: Access Camera Privacy Settings

    • Action:
      • Click the Start button (Windows icon).
      • Click on the Settings gear icon.
      • In the left-hand pane, click “Privacy & security.”
      • In the right-hand pane, scroll down to “App permissions” and click “Camera.”

    Step 2: Turn Off Camera Access

    • Action: At the top of the “Camera” privacy settings, you’ll see “Camera access.” Toggle this switch to “Off.” This immediately prevents all apps on your device from accessing the camera.
    • Optional: Granular Control (if Camera access is On): If you prefer to keep general camera access on but control individual apps:
      • Scroll down to Let apps access your camera” and toggle it off for specific applications.
      • Similarly, review “Desktop apps access your camera” and individually toggle off apps here.
    • Action: This provides a software-level block for camera access by applications.

    Method 3: Uninstall Webcam Drivers (More Persistent Software Disable)

    Uninstalling the drivers makes Windows unable to recognize or use the webcam until new drivers are installed or re-detected. This is more persistent than simply disabling the device.

    Step 1: Open Device Manager

    • Action: Follow Step 1 from Method 1 (Right-click Start > Device Manager).

    Step 2: Locate and Uninstall Webcam Driver

    • Action: Expand “Cameras” or “Imaging devices” and right-click on your webcam.
    • Select “Uninstall device.
    • Action: In the confirmation dialog, you might see a checkbox that says “Attempt to remove the driver for this device.” Check this box if you want to ensure the driver software is removed.
    • Click Uninstall.”
    • Action: Restart your PC. The webcam should no longer appear in Device Manager (or appear as an unknown device without a driver) and should be unusable.

    How to Re-enable (if needed):

    • If you did not check the “Attempt to remove the driver” box, restarting your PC might automatically reinstall the driver.
    • If you did check the box, you’ll need to manually install the driver. Go to Device Manager, click “Action” > “Scan for hardware changes.” If that doesn’t work, you’ll need to visit your laptop manufacturer’s website to download and install the specific webcam driver for your model.

    Method 4: Physical Webcam Cover or Disconnection (Most Permanent and Secure)

    For absolute peace of mind against digital intrusion, a physical barrier is the most foolproof method.

    • Option A: Physical Webcam Cover:
      • Action: Purchase a small, thin webcam cover that slides open and closed. These are inexpensive and widely available online.
      • Application: Adhere it directly over your laptop’s built-in webcam lens.
    • Option B: Disconnect Internal Cable (Advanced – Not Recommended for Average User):
      • Warning: This method requires opening your laptop and potentially voids your warranty. It should only be attempted by experienced users comfortable with hardware modifications. Incorrect disassembly can damage your laptop.
      • Action: If you are technically proficient, you can open your laptop and locate the webcam cable (usually a small, thin cable running from the display assembly to the motherboard). Carefully disconnect it.
    • Action: A physical cover is the simplest and safest “permanent” solution for most users.

    Recommendations for Permanence and Security:

    For the most robust protection:

    1. Start with Method 1 (Disable in Device Manager): This is the easiest and generally effective software method.
    2. Combine with Method 2 (Camera Privacy Settings): This adds an extra layer of software protection by controlling app access.
    3. For maximum peace of mind, add Method 4 (Physical Webcam Cover): This completely negates any software vulnerabilities or driver re-installations. Even if malware bypasses software controls, it cannot see through a physical cover.

    Frequently Asked Questions (FAQ)

    Q1: Is disabling my webcam in Device Manager truly permanent?

    Disabling in Device Manager is a software-based disable. It’s persistent across restarts. However, Windows updates or manual driver installations can sometimes re-enable it. For complete permanence without physical intervention, you’d need to uninstall the drivers and ensure Windows doesn’t automatically reinstall them (which is harder).

    Q2: Will uninstalling the webcam driver completely remove my webcam functionality?

    Yes, uninstalling the driver effectively removes the software that allows your webcam to function. Your operating system won’t know how to communicate with the hardware. However, Windows might automatically detect and reinstall the driver upon a reboot or update. To prevent this, you might need to use a dedicated driver uninstaller or block driver updates for that specific device (more complex).

    Q3: Can a hacker enable my webcam if I’ve disabled it in Device Manager?

    It’s significantly harder. Disabling in Device Manager is a strong deterrent. However, highly sophisticated malware or rootkits might theoretically attempt to re-enable devices or install their own drivers. This is why a physical webcam cover is often recommended for maximum security, as it provides an undeniable physical barrier.

    Q4: Is it safe to just put tape over my laptop’s webcam?

    Yes, placing opaque tape (like electrical tape) or a sticky note over your webcam lens is a simple, effective, and completely safe physical solution. Just ensure it doesn’t leave adhesive residue on the lens itself. Thin sliding webcam covers are a more elegant solution.

    Q5: What is “camfecting”?

    Camfecting is the act of hacking into a person’s webcam and controlling it remotely without their knowledge or consent. It’s a serious privacy invasion often used for surveillance or blackmail, typically achieved through malware (like Trojans or spyware).

    Q6: Does disabling the webcam impact other laptop functions?

    No. Disabling the webcam specifically affects only the camera functionality. Other laptop functions like the microphone, speakers, display, or general system performance will remain unaffected. If you use an external USB webcam, disabling the built-in one will not affect the external one.

  • How to Back up Files Using File History in Windows

    How to Back up Files Using File History in Windows

    Protecting your valuable digital assets is paramount. File History is a powerful, built-in Windows feature that provides an automatic way to back up personal files and their different versions to an external drive. This means if you accidentally delete a file, save over an important document, or your hard drive fails, you can easily restore previous versions or recover lost data.

    Understanding File History

    File History operates by periodically scanning specific folders (like your Libraries, Desktop, Contacts, Favorites) and backing up any changes to a designated external drive (USB drive, external hard drive, or network location). It saves multiple versions of your files, allowing you to go back to a specific point in time to retrieve an older iteration of a document or a file that was deleted. It’s not a full system image backup, but rather a robust solution for your personal data.

    Step 1: Connect an External Drive

    File History requires a dedicated external drive to store your backups. This can be:

    • A USB flash drive (for smaller backups, typically documents).
    • An external hard drive (recommended for comprehensive backups of photos, videos, and documents).
    • A network drive or shared folder (if available on your home network).
    1. Connect Drive: Plug your chosen external drive into your Windows PC’s USB port or ensure your network drive is accessible.
    2. Verify Recognition: Confirm that Windows recognizes the drive and it appears in File Explorer.

    Step 2: Access File History Settings

    The way to access File History settings varies slightly between Windows 10 and Windows 11.

    Method A: For Windows 11

    1. Open Settings: Click the Start button and then the gear icon for Settings, or press Windows key + I.
    2. Navigate to Storage: In the Settings window, go to “System” > “Storage.”
    3. Open Advanced Storage Settings: Scroll down and click on “Advanced storage settings.”
    4. Find Backup Options: Click on “Backup options.”
    5. Access File History: Under “Looking for an older backup?” (or similar), click “Go to Backup and Restore (Windows 7)” or look for a direct link to File History settings. Note: In Windows 11, Microsoft has moved File History to a less prominent location, often encouraging OneDrive backup instead. You might need to use the Control Panel method below for direct access.

    Method B: For Windows 10 & Universal Control Panel Access

    This method works for both Windows 10 and Windows 11 by accessing the classic Control Panel.

    1. Open Control Panel:
      • Search: Click the Start button or Search icon on your taskbar, type “Control Panel,” and select it.
      • Run Command: Press Windows key + R, type control, and press Enter.
    2. Set View By: In Control Panel, set “View by:” to “Large icons” or “Small icons” (if it’s not already).
    3. Find File History: Click on “File History.”

    Step 3: Turn On File History and Select Drive

    Once you are in the File History Control Panel window:

    1. Check Status: You’ll see if File History is currently “On” or “Off.”
    2. Select Drive:
      • If it’s “Off,” you’ll likely see your connected external drive listed under “Select a drive.” Click on it to select.
      • If multiple drives are connected or you want to use a network location, click “Select drive” in the left-hand pane. Choose your desired drive and click “OK.”
    3. Turn On: Click the “Turn on” button.
      • File History will immediately begin its first backup of your selected folders. The time this takes depends on the amount of data.

    Step 4: Configure What Files Are Backed Up (Optional)

    By default, File History backs up your personal folders within your user profile, such as:

    • Desktop
    • Documents
    • Downloads
    • Music
    • Pictures
    • Videos
    • OneDrive (if configured to sync files locally)
    • Saved Games
    • Contacts
    • Favorites

    You can customize which folders are included or excluded.

    1. Exclude Folders: In the File History Control Panel window, click “Exclude folders” in the left-hand pane.
    2. Add/Remove Folders:
      • Click “Add” to browse for and select folders you don’t want to back up.
      • Select a folder from the list and click “Remove” if you change your mind.
    3. Save Changes: Click “Save changes.”

    Step 5: Adjust Advanced Settings (Optional)

    You can fine-tune how File History operates.

    1. Advanced Settings: In the File History Control Panel window, click “Advanced settings” in the left-hand pane.
    2. Configure Backup Frequency:
      • Save copies of files:” Use this drop-down to choose how often File History backs up changes (e.g., every 10 minutes, hourly, daily). More frequent backups offer better protection but use more space.
    3. Configure Retention Period:
      • Keep saved versions:” Use this drop-down to select how long File History keeps old versions of your files (e.g., “Until space is needed,” “1 month,” “Forever”). “Until space is needed” is the default and usually sufficient, as it deletes the oldest versions when the drive fills up.
    4. Other Options: You might also find options to clean up versions or change user account settings if you share the computer.
    5. Save Changes: Click “Save changes” or “OK.”

    Step 6: Restore Files Using File History

    This is where your backups pay off. You can restore individual files, entire folders, or all your backed-up data.

    Option A: Restore a Specific File/Folder

    1. Open File History Restore Interface:
      • Search: Click Start, type “Restore your files with File History,” and select the app.
      • Control Panel: Go to Control Panel > File History, then click “Restore personal files” in the left-hand pane.
    2. Browse for Files:
      • The File History window will open, showing you the folders that are being backed up.
      • Navigate to the folder containing the file or subfolder you want to restore.
    3. View Previous Versions:
      • Use the left and right arrows at the bottom of the window to browse through different backup dates and times. As you move through time, you’ll see the state of your files and folders at that particular backup point.
      • When you find the version of the file or folder you want to restore, select it.
    4. Restore:
      • Click the green circular arrow icon at the bottom of the window. This will restore the file/folder to its original location, overwriting the current version if one exists (you’ll be prompted to confirm).
      • Restore to a different location (Optional): Right-click the file/folder and select “Restore to…” to save it to a new location, which is safer if you’re unsure.

    Option B: Restore All Files

    1. Open File History Restore Interface (as above).
    2. Navigate to Top Level: Use the back arrow to go back to the top-level view of your backed-up folders.
    3. Select All: There isn’t a single “Restore All” button. Instead, select all the top-level folders you wish to restore (e.g., Desktop, Documents, Pictures) by clicking and dragging or holding Ctrl and clicking each.
    4. Click Restore Button: Click the green circular arrow icon to restore them to their original locations.

    Important: Keep your external drive connected regularly (e.g., daily or weekly) for File History to perform automatic backups. If the drive is disconnected, File History will pause and notify you.

    Considerations for File History

    • Dedicated Drive: Always use a drive exclusively for File History for best performance and organization.
    • Capacity: Ensure your external drive has sufficient capacity to hold multiple versions of your files.
    • Security: As with any backup, keep your external drive in a safe place, ideally off-site, to protect against physical damage or theft.
    • Complementary to Cloud: File History works well in conjunction with cloud storage services (like OneDrive, Google Drive) for an added layer of protection. File History can even back up your local OneDrive sync folders.

    By setting up and regularly using File History, you create a vital safety net for your personal data, ensuring peace of mind and easy recovery from common data loss scenarios.

    FAQ: How to Back up Files Using File History in Windows

    Q1: What exactly does File History back up?

    File History primarily backs up your personal files stored in default Windows user folders like Desktop, Documents, Downloads, Music, Pictures, and Videos. It also includes Contacts, Favorites, and locally synced OneDrive files. It does NOT create a full system image backup of your operating system or installed programs.

    Q2: Do I need an external drive for File History to work?

    Yes, File History requires a dedicated external drive (like a USB flash drive, an external hard drive, or a network drive) to store its backups. It cannot back up files to the same drive where the original files are located, as that would defeat the purpose of backup for data recovery.

    Q3: How often does File History back up my files?

    By default, File History backs up changes to your files hourly. You can customize this frequency in the Advanced settings of File History (accessible via Control Panel) to be as frequent as every 10 minutes or as infrequent as daily.

    Q4: Can File History restore deleted files or previous versions of files?

    Yes, that’s one of its primary strengths! File History saves multiple versions of your files over time. If you accidentally delete a file, or save over an important document with unwanted changes, you can use the File History restore interface to browse through different time points and recover the deleted file or an older version of a modified file.

    Q5: Is File History the same as a full system backup or System Restore?

    No, they are different:

    • File History: Focuses on backing up personal files and their versions. It’s for data recovery.
    • System Restore: Reverts your Windows operating system’s critical system files, drivers, and registry settings to an earlier state to fix software issues. It does not back up or restore personal files.
    • Full System Backup/System Image: Creates a complete copy of your entire hard drive, including the operating system, programs, and personal files. This is used for disaster recovery where your entire system might need to be rebuilt. File History is not a full system image backup.
  • How to Fix HDMI Not Working on Windows Laptop

    How to Fix HDMI Not Working on Windows Laptop

    Connecting your Windows laptop to an external display via HDMI is a common way to expand your workspace, enjoy movies on a bigger screen, or give presentations. When your HDMI not working on Windows laptop, it can be frustrating, leaving you with a blank screen or no audio. This common issue can stem from various sources, ranging from simple cable problems to complex driver conflicts.

    The High-Definition Multimedia Interface (HDMI), first introduced in 2002, revolutionized how we connect audio and video devices. Before HDMI, you often needed multiple cables (VGA or DVI for video, and separate audio cables) to connect a computer to a display. HDMI simplified this by carrying both high-definition video and audio signals over a single cable, becoming the industry standard for consumer electronics and PCs. Its widespread adoption means that troubleshooting connection issues is a crucial skill for any modern computer user. This guide will walk you through a comprehensive set of solutions to diagnose and fix HDMI not working on your Windows laptop, from the simplest checks to more advanced driver management.

    Understanding HDMI Connections

    Before troubleshooting, it’s helpful to understand the components involved:

    • HDMI Port (on Laptop): The physical port on your laptop that sends the signal.
    • HDMI Cable: The cable that carries both video and audio signals.
    • HDMI Port (on Display): The physical port on your TV, monitor, or projector that receives the signal.
    • External Display: Your TV, monitor, or projector.
    • Graphics Driver: The software that allows your Windows laptop to communicate with its graphics hardware and output video signals.
    • Audio Driver: The software that handles audio output, including via HDMI.

    When any of these components malfunction or are misconfigured, your HDMI connection can fail.

    Basic Checks: The First Steps to Troubleshooting

    Often, the fix for HDMI not working on Windows laptop is incredibly simple. Start with these fundamental checks.

    Step 1: Check Physical Connections

    1. Reseat the Cables: Disconnect both ends of the HDMI cable (from your laptop and the external display) and plug them back in firmly. Ensure they are fully seated in their respective ports.
    2. Try a Different HDMI Port:
      • On your external display, if it has multiple HDMI ports, try connecting the cable to a different one.
      • Make sure the display’s input source is switched to the correct HDMI port (e.g., HDMI 1, HDMI 2). Use your display’s remote control or on-screen menu.
    3. Test a Different HDMI Cable: HDMI cables can go bad. If you have a spare, try using a different cable. A faulty cable is a very common reason for no signal.
    4. Test a Different Display: If possible, try connecting your laptop to a different HDMI-compatible display (another TV, monitor) to rule out issues with your primary display.
    5. Test a Different Device (Optional): Connect another device (e.g., a gaming console, a DVD player) to your external display using the same HDMI cable and port. This helps determine if the issue is with your display or the laptop.

    Step 2: Restart Devices

    1. Restart Your Laptop: A simple reboot can often resolve temporary glitches.
    2. Power Cycle Your Display: Turn off your external display, unplug its power cable from the wall for about 30 seconds, then plug it back in and turn it on. This can reset the display’s HDMI handshake process.

    Software and Settings Solutions

    If the basic checks don’t resolve the issue, the problem might be with your Windows settings or drivers.

    Step 3: Configure Display Settings in Windows

    Windows might not be detecting or extending to the external display correctly.

    1. Access Display Settings:
      • Press Windows key + P. This shortcut brings up the “Project” or “Project to a second screen” menu.
      • Entity: The Windows key (often marked with the Windows logo) is a modifier key on most modern keyboards, used for various shortcuts and to access the Start Menu.
    2. Select a Display Mode: Choose one of the following options:
      • Duplicate: Shows the same content on both your laptop and the external display.
      • Extend: Extends your desktop across both displays, giving you more screen space.
      • Second screen only: Shows content only on the external display (your laptop screen will be blank).
      • PC screen only: Shows content only on your laptop (external display will be blank).
      • Try selecting “Duplicate” or “Extend” first. If you choose “Second screen only” and your external display is still black, you won’t see anything!
    3. Manually Detect Displays:
      • Right-click on an empty area of your desktop and select “Display settings.”
      • Scroll down and click the “Detect” button (in Windows 10/11, it might be hidden, so try clicking “Identify” or scrolling to the bottom of the display settings).
      • Sometimes, simply changing the resolution or refresh rate for the external display can resolve compatibility issues.

    Step 4: Update or Reinstall Graphics Drivers

    Outdated or corrupted graphics drivers are a very common cause of HDMI issues.

    1. Open Device Manager:
      • Right-click the Start button (Windows icon) and select “Device Manager.”
      • Entity: Device Manager is a component of the Microsoft Windows operating system that allows users to view and control the hardware attached to the computer. It provides information about installed drivers, allows updating drivers, enabling/disabling devices, and troubleshooting hardware issues.
    2. Expand Display Adapters: In Device Manager, expand the “Display adapters” section. You will likely see your integrated graphics (e.g., Intel Iris/UHD Graphics) and potentially a dedicated graphics card (e.g., NVIDIA GeForce, AMD Radeon).
    3. Update Driver:
      • Right-click on each graphics adapter listed.
      • Select “Update driver.”
      • Choose “Search automatically for drivers.” Windows will try to find and install the latest driver.
    4. Reinstall Driver (if update fails):
      • If updating doesn’t work, right-click the graphics adapter again.
      • Select “Uninstall device.”
      • Check the box “Attempt to remove the driver software for this device” (if available).
      • Click “Uninstall.”
      • Restart your laptop. Windows will typically reinstall a generic display driver upon reboot. Then, proceed to download the latest driver directly from your laptop manufacturer’s website or the graphics card manufacturer’s website (Intel, NVIDIA, AMD).
      • Why reinstall? Sometimes, a corrupted driver cannot be fixed by an update; a clean reinstall is necessary.

    Step 5: Check and Update Audio Drivers

    Even if you’re only having video issues, the HDMI signal carries audio too, and sometimes an audio driver conflict can affect the entire connection.

    1. Open Device Manager: (Same as Step 4.1).
    2. Expand Sound, video and game controllers:
    3. Update/Reinstall HDMI Audio Driver: Look for an entry related to your HDMI audio (e.g., “Intel Display Audio,” “NVIDIA High Definition Audio,” “AMD High Definition Audio Device”).
      • Right-click on it and select “Update driver.”
      • If that doesn’t work, “Uninstall device” and restart your laptop to reinstall.

    Step 6: Roll Back Graphics Driver

    If the issue started after a recent driver update, rolling back might fix it.

    1. Open Device Manager: (Same as Step 4.1).
    2. Expand Display Adapters:
    3. Roll Back Driver:
      • Right-click your graphics adapter.
      • Select “Properties.”
      • Go to the “Driver” tab.
      • If the “Roll Back Driver” button is active, click it. Follow the prompts.
      • Entity: A driver rollback is a process in which a previously installed software driver for a hardware device is replaced with an older version. This is typically done when a newly installed driver causes stability issues or malfunctions with the hardware.

    Step 7: Disable and Re-enable Graphics Adapter

    A quick toggle can sometimes re-establish communication.

    1. Open Device Manager: (Same as Step 4.1).
    2. Expand Display Adapters:
    3. Disable/Enable: Right-click on your graphics adapter and select “Disable device.” Confirm when prompted. Wait a few seconds, then right-click again and select “Enable device.”

    Advanced Solutions

    If the above methods haven’t worked, consider these more advanced steps.

    Step 8: Check for Windows Updates

    Windows updates often include driver updates and bug fixes that can resolve compatibility issues.

    1. Open Settings: Press Windows key + I.
    2. Go to “Windows Update” (Windows 11) or “Update & Security” > “Windows Update” (Windows 10).
    3. Check for updates: Install any pending updates and restart your laptop.

    Step 9: Disable Fast Startup (Windows 10/11)

    Sometimes, Fast Startup can interfere with hardware detection.

    1. Search for “Control Panel” in the Start Menu and open it.
    2. Go to “Hardware and Sound” > “Power Options.”
    3. Click “Choose what the power buttons do” (on the left pane).
    4. Click “Change settings that are currently unavailable.”
    5. Uncheck “Turn on fast startup (recommended).”
    6. Click “Save changes” and then restart your laptop fully.

    Step 10: Check BIOS/UEFI Settings (Advanced Users)

    In rare cases, specific settings in your laptop’s BIOS/UEFI might affect HDMI output, especially if you have a dedicated graphics card and integrated graphics. Look for options related to graphics output, display settings, or multi-monitor support. Proceed with caution as incorrect BIOS changes can cause system instability. Consult your laptop’s manual for specific instructions.

    The Importance of Connectivity

    The seamless operation of connections like HDMI is fundamental to modern computing. It represents the crucial link between your processing unit and your visual and auditory experience. When your HDMI not working on Windows laptop, it highlights the intricate dance between hardware, drivers, and operating system configurations. Understanding how to troubleshoot these connections empowers you to take control of your digital environment, ensuring that your devices work together harmoniously and that you can always enjoy your content on the screen of your choice.

    Frequently Asked Questions (FAQ)

    Q1: My HDMI works for video but not audio. How can I fix that?

    • Check Default Playback Device: Right-click the speaker icon on your taskbar, go to “Sound settings” (or “More sound settings” on Windows 11 to open the classic Sound Control Panel). In the “Playback” tab, ensure your HDMI output (e.g., “Intel Display Audio,” “NVIDIA High Definition Audio”) is enabled and set as the “Default Device.”
    • Update/Reinstall Audio Drivers: As mentioned in Step 5, update or reinstall the audio drivers associated with your HDMI output in Device Manager.
    • Check Display/TV Audio Settings: Ensure your TV or monitor’s audio output is not muted or set to external speakers if you want sound from the display itself.

    Q2: Why does my laptop screen go black when I connect HDMI?

    This usually indicates that Windows has switched to “Second screen only” mode (Windows key + P) and the external display isn’t receiving a signal or is set to the wrong input.

    • Press Windows key + P repeatedly to cycle through the display modes. You should eventually hit “Duplicate” or “Extend” and see your laptop screen again.
    • Ensure your external display is powered on and set to the correct HDMI input.
    • Try a different HDMI cable.

    Q3: My HDMI port feels loose. Is that the problem?

    A loose physical port can definitely be the problem. If the port is physically damaged, bent, or if the cable wiggles easily, it might be preventing a stable connection. In such cases, the port might need professional repair or replacement.

    Q4: Can HDMI adapters or docking stations cause issues?

    Yes, they can. While convenient, adapters (e.g., USB-C to HDMI, DisplayPort to HDMI) and docking stations introduce another link in the chain where issues can arise.

    • Test the HDMI connection directly from your laptop to the display if possible.
    • Ensure your adapter/docking station is of good quality and has updated firmware (if applicable).
    • Try a different adapter/docking station if you suspect it’s faulty.

    Q5: My HDMI connection worked fine yesterday, but not today. What changed?

    Even if it worked before, common culprits for sudden failure include:

    • Loose Cable: A cable that was slightly disturbed.
    • Recent Software/Driver Update: A Windows update or graphics driver update might have introduced a bug. Try rolling back drivers (Step 6).
    • Display Settings Reset: Sometimes display settings can revert. Check Windows key + P (Step 3).
    • Power Cycle: Your laptop or display might be stuck in a strange state. Perform a full power cycle (Step 2).

    Q6: What is HDCP, and could it cause HDMI issues?

    HDCP (High-bandwidth Digital Content Protection) is a copy protection scheme used on HDMI connections to prevent unauthorized copying of copyrighted material. If there’s an HDCP handshake failure between your laptop and the display, you might see a blank screen or an error message. This is more common with certain content (e.g., Blu-ray playback, streaming services) and less so with general desktop use. Ensuring all your drivers are up-to-date and using certified HDMI cables can help mitigate HDCP issues.

  • How to Use Virtual Desktops in Windows 11

    How to Use Virtual Desktops in Windows 11

    In today’s fast-paced digital environment, managing multiple open applications and windows can quickly lead to a cluttered and overwhelming desktop. This is where virtual desktops, also known as multiple desktops or Task View, become incredibly useful in Windows 11. They allow you to create separate, organized workspaces for different tasks or projects, effectively giving you more screen real estate without needing extra monitors.

    The concept of virtual desktops isn’t new. It has been a staple feature in Linux environments for decades and a popular add-on utility for Windows users long before Microsoft integrated it natively. Microsoft first introduced its official Virtual Desktops feature in Windows 10 as part of its “Task View.” With Windows 11, this feature received a significant visual and functional overhaul, making it more intuitive, customizable, and visually appealing, aligning with Windows 11’s focus on productivity and a cleaner user interface.

    Learning to effectively use virtual desktops can significantly boost your productivity, reduce clutter, and help you focus on one task at a time. This guide will walk you through everything you need to know about using virtual desktops in Windows 11.

    Understanding Virtual Desktops

    Imagine having multiple physical monitors, each dedicated to a different set of tasks, but all on your single screen. That’s essentially what virtual desktops offer. Each virtual desktop is an independent workspace where you can open specific applications. For example:

    • Desktop 1: For work (e.g., email, word processor, spreadsheets).
    • Desktop 2: For personal Browse (e.g., social media, news sites).
    • Desktop 3: For creative projects (e.g., photo editor, design software).

    Switching between these desktops is quick and seamless, allowing you to instantly move from one context to another without minimizing or maximizing countless windows.

    Accessing Task View (Virtual Desktops Hub)

    The Task View button is your gateway to managing virtual desktops.

    1. Locate the Task View Icon:
      • The Task View icon looks like two overlapping squares. It’s typically located on your Taskbar, usually to the right of the Start button and Search icon.
      • If you don’t see it, right-click an empty space on the Taskbar, select “Taskbar settings,” and ensure “Task View” is toggled On.
    2. Click the Icon: Click the Task View icon on the Taskbar. This will open an overlay showing all your open windows and your current virtual desktops at the bottom.

    Creating New Virtual Desktops

    You can easily create as many virtual desktops as you need.

    1. Using the Task View Icon:
      • Click the Task View icon on the Taskbar.
      • At the bottom of the screen, you’ll see a row of your current desktops. Click “+ New desktop” (or the plus sign with a desktop icon).
      • A new, empty virtual desktop will appear in the row.
    2. Using Keyboard Shortcut:
      • Press Windows key + Ctrl + D.
      • This immediately creates a new virtual desktop and switches you to it. This is a very quick way to get a clean slate for a new task.

    Switching Between Virtual Desktops

    Seamless navigation is key to productivity with virtual desktops.

    1. Using Task View:
      • Click the Task View icon on the Taskbar.
      • Click on the thumbnail of the virtual desktop you want to switch to in the row at the bottom.
    2. Using Keyboard Shortcuts:
      • Press Windows key + Ctrl + Left Arrow to switch to the desktop on the left.
      • Press Windows key + Ctrl + Right Arrow to switch to the desktop on the right.
      • This is the fastest and most efficient way to navigate if you have multiple desktops.

    Moving Applications Between Virtual Desktops

    You’re not stuck with applications on the desktop where they were opened. You can move them easily.

    1. Using Task View:
      • Click the Task View icon.
      • Hover your mouse over the application window you want to move.
      • Drag and Drop: Click and drag the application’s thumbnail directly onto the thumbnail of the target virtual desktop in the row at the bottom.
      • Right-Click: Alternatively, right-click on the application’s thumbnail, select “Move to,” and then choose the target virtual desktop (e.g., “Desktop 2”) or “New desktop” to move it to a newly created one.

    Customizing Virtual Desktops

    Windows 11 introduced some welcome customization options for your virtual desktops.

    1. Rename a Desktop:
      • Click the Task View icon.
      • Hover your mouse over the virtual desktop’s thumbnail in the row at the bottom.
      • Right-click on the thumbnail and select “Rename.”
      • Type a new name (e.g., “Work,” “Personal,” “Gaming”) and press Enter. This makes organization much clearer.
    2. Change Desktop Background:
      • Click the Task View icon.
      • Hover your mouse over the virtual desktop’s thumbnail.
      • Right-click on the thumbnail and select “Choose background.”
      • This will open the Personalization settings specifically for that desktop’s background. You can choose a different picture, solid color, or slideshow. This visual distinction can help you quickly identify which desktop you’re on.
    3. Rearrange Desktops:
      • Click the Task View icon.
      • Click and drag a virtual desktop’s thumbnail in the bottom row to rearrange its order. This can be useful if you prefer a specific flow for your workspaces.

    Closing Virtual Desktops

    When you’re done with a virtual desktop, you can close it.

    1. Using Task View:
      • Click the Task View icon.
      • Hover your mouse over the virtual desktop’s thumbnail you want to close in the row at the bottom.
      • Click the “X” icon that appears in the top-right corner of the thumbnail.
    2. Using Keyboard Shortcut:
      • Switch to the virtual desktop you want to close.
      • Press Windows key + Ctrl + F4.
      • Important Note: When you close a virtual desktop, any open applications on that desktop will automatically move to the adjacent virtual desktop (usually the one on the left). They will not be closed.

    Settings for Virtual Desktops

    You can fine-tune how virtual desktops behave in Windows 11 settings.

    1. Open Settings: Press Windows key + I.
    2. Navigate to Multitasking: Go to System > Multitasking.
    3. Adjust Desktop Behaviors:
      • “Desktops” section:
        • “Show my open windows on the Taskbar”:
          • “On all desktops”: This will show all open application icons on your taskbar, regardless of which desktop they are on. This can be useful if you often switch between apps on different desktops.
          • “On the desktop I’m using”: This is the default. Only shows icons for apps open on your current desktop. This helps maintain a clean taskbar for each workspace.
        • “Show all open windows when I press Alt + Tab”:
          • “On all desktops”: Alt + Tab will show all open windows across all your virtual desktops.
          • “On the desktop I’m using”: Alt + Tab will only show windows open on your current virtual desktop. This is often preferred for focus.

    Experiment with these settings to find what works best for your workflow. For many users, keeping the default “On the desktop I’m using” for both is ideal for maintaining focus within each distinct workspace.

    Tips for Maximizing Productivity with Virtual Desktops

    • Organize by Task/Project: Dedicate separate desktops to different aspects of your life – one for work, one for personal Browse, one for a specific project, etc. This helps you mentally switch gears.
    • Use Distinct Backgrounds: Assign unique backgrounds to each virtual desktop. This provides a quick visual cue as to which workspace you’re currently in.
    • Master Keyboard Shortcuts: The Windows key + Ctrl + Left/Right Arrow shortcuts are game-changers. Practicing them will make switching between desktops incredibly fluid.
    • Persistent Applications: If you have an application you need on every desktop (e.g., your chat app or email client), you can right-click its thumbnail in Task View and select “Show this window on all desktops.”
    • Drag & Drop to Taskbar: In Task View, you can also drag an application’s thumbnail directly onto the Taskbar to pin it or rearrange it, just like you would on your main desktop.

    By integrating virtual desktops into your daily workflow, you can transform a chaotic single screen into a highly organized and efficient multi-workspace environment, making your Windows 11 experience significantly more productive and enjoyable.

    Frequently Asked Questions (FAQ)

    Q1: How many virtual desktops can I create in Windows 11?

    While there isn’t a strict hard limit, the practical limit is usually dictated by your system’s RAM and CPU. You can create many virtual desktops, but having too many open applications across them will still consume system resources and can slow down your PC, just as if they were all on a single desktop. Most users find 3-5 desktops sufficient for effective organization.

    Q2: Do applications close when I close a virtual desktop?

    No, when you close a virtual desktop in Windows 11, any open applications on that desktop will automatically move to the adjacent virtual desktop (usually the one to its left). The applications themselves are not closed or minimized.

    Q3: Can I set a different wallpaper for each virtual desktop?

    Yes, Windows 11 allows you to set a different background/wallpaper for each virtual desktop. This is a great way to visually differentiate your workspaces. You can do this by right-clicking the desktop’s thumbnail in Task View and selecting “Choose background.”

    Q4: What’s the fastest way to switch between virtual desktops?

    The fastest way to switch between virtual desktops is by using the keyboard shortcuts: Windows key + Ctrl + Left Arrow to go left and Windows key + Ctrl + Right Arrow to go right.

    Q5: Can I move a specific application to a new virtual desktop directly?

    Yes, when you’re in the Task View (by clicking the icon or pressing Windows key + Tab), you can drag an application’s window thumbnail directly onto the “+ New desktop” button at the bottom, or onto an existing virtual desktop’s thumbnail, to move it there. You can also right-click an application’s thumbnail and use the “Move to” option.

  • How to Create Guest Account in Windows

    How to Create Guest Account in Windows

    Sharing your Windows PC with friends, family, or temporary visitors can be a common scenario. However, you likely don’t want them accessing your personal files, changing system settings, or installing unwanted software. While older versions of Windows had a dedicated “Guest” account, Windows 10 and 11 no longer offer this traditional, built-in feature with its specific ephemeral nature (where changes are erased upon logout).

    Instead, the best way to create a guest account in Windows for modern PCs is to create a standard local user account with limited privileges. This achieves the same goal of providing safe, restricted access to your computer without compromising your main account or system integrity. This guide will walk you through the various methods to set up such an account.

    Why Create a Guest-Like Account?

    • Privacy: Keep your personal files, documents, photos, and Browse history private from temporary users.
    • Security: Prevent guests from installing malware, making unauthorized system changes, or accessing administrative functions.
    • System Stability: Ensure your core system settings remain untouched, preventing accidental (or intentional) disruptions.
    • Clean Slate (Manual Reset): While not automatic like the old Guest account, you can manually delete and recreate this account to provide a fresh environment for each new “guest.”

    Understanding User Account Types in Windows

    Before we start, it’s helpful to know the two main types of user accounts in Windows:

    • Administrator Account: Has full control over the PC, including installing software, changing system settings, and accessing all files. Your primary account should typically be an administrator.
    • Standard User Account: Can run programs, save files in their own user folder, and browse the internet, but cannot install most software, change system settings, or access other users’ files without administrator password approval. This is the ideal type for a “guest” account.

    Method 1: Using Windows Settings (Recommended for Most Users)

    This is the most straightforward and user-friendly way to create a new local standard user account.

    For Windows 11:

    1. Open Settings: Click the Start button and select Settings (the gear icon).
    2. Navigate to Other Users: In the Settings window, click “Accounts” in the left sidebar, then select “Family & other users” or directly “Other users.”
    3. Add Account: Under “Other users,” click the “Add account” button next to “Add other user.”
    4. Bypass Microsoft Account:
      • A “Microsoft account” prompt will appear. Click “I don’t have this person’s sign-in information.”
      • On the next screen, click “Add a user without a Microsoft account.”
    5. Create Local Account:
      • Who’s going to use this PC?: Enter a generic username like “GuestUser,” “Visitor,” or any name you prefer (you cannot use “Guest” as it’s a reserved word, though it will function as a guest account).
      • Password: You can leave the password fields blank if you want a password-free account for easy access. If you want a basic layer of security, enter a password and hint.
      • Click “Next” to create the account.
    6. Verify Account Type:
      • The account will be created as a Standard User by default, which is exactly what you want for a guest-like account.
      • To confirm or change, back on the “Family & other users” screen, find the newly created account. Click on it, then select “Change account type”. Ensure “Standard User” is selected and click “OK.”

    For Windows 10:

    1. Open Settings: Click the Start button and select Settings (the gear icon).
    2. Navigate to Family & other users: In the Settings window, click Accounts, then select “Family & other users” in the left sidebar.
    3. Add Account: Under “Other users,” click Add someone else to this PC.
    4. Bypass Microsoft Account:
      • A “Microsoft account” prompt will appear. Click “I don’t have this person’s sign-in information.”
      • On the next screen, click “Add a user without a Microsoft account.”
    5. Create Local Account:
      • Who’s going to use this PC?: Enter a username like “GuestUser,” “Visitor,” or any suitable name.
      • Password: You can leave the password fields blank.
      • Click “Next” to create the account.
    6. Verify Account Type:
      • The account will be created as a Standard User by default.
      • To confirm or change, find the newly created account under “Other users,” click on it, then click “Change account type.” Ensure “Standard User” is selected and click “OK.”

    Method 2: Using Command Prompt (For Advanced Users)

    You can quickly create a local standard user account using Command Prompt.

    Step-by-Step:

    1. Open Command Prompt as Administrator:
      • Press Win + R, type cmd, and press Enter.
      • Or, search for “Command Prompt” in the Start Menu, right-click, and select “Run as administrator.”
    2. Create the User Account: Type the following command and press Enter. Replace GuestUser with your desired username (e.g., Visitor).

    DOS

    net user GuestUser /add

    (This creates a local user account named “GuestUser”).

    1. (Optional) Set a Password: If you want to set a password, type:

    DOS

    net user GuestUser *

    You will be prompted to enter and confirm the password. Press Enter twice if you want no password.

    1. Add to Guests Group (For traditional guest-like behavior, though limited in modern Windows):
      • This command attempts to add the newly created user to the “Guests” local group. While this group’s permissions are more restrictive, Windows 10/11’s “Guests” group doesn’t behave like the older ephemeral “Guest” account.

    DOS

    net localgroup guests GuestUser /add

    1. Remove from Users Group (Important for security): This ensures the account is not part of the general “Users” group, which usually has more permissions.

    DOS

    net localgroup users GuestUser /delete

    (Note: For accounts created via Settings, they are often already “Standard Users” and not part of the “Guests” group, which is generally secure enough. This step is more relevant if you’re trying to replicate older “Guest” account behavior.)

    1. Exit Command Prompt: Type exit and press Enter.

    Method 3: Using Computer Management (For Pro/Enterprise Users)

    This method provides more granular control and is often used by IT professionals.

    Step-by-Step:

    1. Open Computer Management:
      • Right-click the Start button and select “Computer Management.”
      • Alternatively, press Win + R, type compmgmt.msc, and press Enter.
    2. Navigate to Users: In the left pane, expand Local Users and Groups, then click on Users.
    3. Create New User: Right-click in the empty space in the right pane and select “New User…
    4. Fill in Details:
      • User name: Enter your desired name (e.g., GuestUser).
      • Full name (Optional): Add a descriptive name.
      • Description (Optional): Add a description like “Temporary guest account.”
      • Password: Enter a password or leave it blank.
      • Uncheck “User must change password at next logon.”
      • Check “Password never expires.”
      • Check “Account is disabled” (only if you want to create it disabled and enable later).
      • Click Create,” then “Close.”
    5. Set Account Type (Crucial):
      • Right-click on the newly created user (e.g., GuestUser) and select “Properties.”
      • Go to the “Member Of” tab.
      • Select “Users” and click “Remove.”
      • Click “Add…”
      • In the “Select Groups” dialog, type “Guests” and click “Check Names,” then “OK.”
      • Click “Apply” and “OK.”

    How to Access the Guest-Like Account

    Once the account is created, you can switch to it from the login screen:

    1. Lock your PC: Press Win + L to lock your computer.
    2. Switch User: On the lock screen, click on the user icon (usually in the bottom left corner) to see a list of available user accounts.
    3. Select the Guest Account: Choose the “GuestUser” or “Visitor” account you created.
    4. Log In: If you set a password, enter it. If not, just press Enter.

    Limitations of Modern “Guest” Accounts

    It’s important to reiterate that the modern approach to creating a guest account in Windows 10/11 (a standard local user) differs from the traditional Guest account in older Windows versions:

    • No Automatic Data Wipe: Any changes made by the “guest” (browser history, downloaded files, desktop icons, etc.) are not automatically erased when they log out. To truly clear the account, you would need to delete and recreate it.
    • Limited Customization: While a standard user, it still doesn’t offer the same ephemeral nature as the old Guest account.
    • Admin Privileges Still Required: Guests cannot install software or make system-wide changes without the administrator’s password.
    • File Access: Standard users generally cannot access files in other user profiles unless permissions are explicitly changed by an administrator. However, files on public folders or root directories of other drives might be accessible. If you have sensitive data outside your user profile, consider setting explicit permissions on those folders to deny access to the “Guests” group or the specific guest user.

    Creating a dedicated standard user account is the most effective and secure way to provide temporary, restricted access to your Windows PC. By following these steps, you can confidently share your computer while safeguarding your personal data and maintaining system integrity.

  • How to Use keyboard Shortcuts in Windows for Productivity

    How to Use keyboard Shortcuts in Windows for Productivity

    Navigating your Windows laptop solely with a mouse or touchpad can be inefficient. For a significant boost in speed and workflow, mastering keyboard shortcuts in Windows for productivity is a game-changer. These simple key combinations allow you to perform common tasks, manage windows, access features, and interact with applications much faster than clicking through menus. This guide will introduce you to essential Windows shortcuts and explain how to integrate them into your daily routine.

    Why Use Keyboard Shortcuts?

    • Speed: Perform actions instantly without moving your hand to the mouse.
    • Efficiency: Reduce repetitive strain on your wrist and hand.
    • Focus: Stay immersed in your work without visual distractions of menus.
    • Professionalism: Demonstrate expertise and control over your system.

    Let’s explore key categories of Windows shortcuts that will enhance your productivity.

    1. Basic Text Editing and File Management Shortcuts

    These are fundamental across almost all applications and the operating system.

    • Ctrl + C: Copy selected text, files, or folders.
    • Ctrl + X: Cut selected text, files, or folders (moves them).
    • Ctrl + V: Paste copied or cut items.
    • Ctrl + Z: Undo the last action. Indispensable for correcting mistakes.
    • Ctrl + Y: Redo the last undone action.
    • Ctrl + A: Select all items in a window, document, or text field.
    • Ctrl + F: Find text within a document or webpage.
    • Ctrl + S: Save the current document or file.
    • Ctrl + P: Print the current document or page.
    • Ctrl + B / I / U: Apply Bold, Italic, or Underline formatting to selected text (common in text editors).
    • F2: Rename the selected file or folder in File Explorer.
    • Delete: Move selected files/folders to the Recycle Bin.
    • Shift + Delete: Permanently delete selected files/folders (bypasses Recycle Bin, use with caution!).
    1. Windows Key Shortcuts (System-Level Productivity)

    The Windows key (Win key) is your gateway to powerful system-wide commands.

    • Win key: Open or close the Start Menu.
    • Win key + D: Show or hide the desktop. Minimize all open windows.
    • Win key + E: Open File Explorer.
    • Win key + L: Lock your computer. Instantly secure your session when stepping away.
    • Win key + R: Open the Run dialog box (for quick access to programs and system commands).
    • Win key + Tab: Open Task View to see all open windows and virtual desktops.
    • Win key + M: Minimize all active windows.
    • Win key + Shift + M: Restore minimized windows to the desktop.
    • Win key + A: Open Quick Settings / Action Center (Windows 11) or Action Center (Windows 10).
    • Win key + I: Open Settings.
    • Win key + S: Open Windows Search.
    • Win key + . (period) or ; (semicolon): Open the Emoji panel (for emojis, GIFs, and symbols).
    • Win key + Print Screen: Take a screenshot of your entire screen and automatically save it to your Pictures > Screenshots folder.
    • Win key + Shift + S: Open Snipping Tool for custom screen capturing.
    • Win key + V: Open Clipboard History (if enabled in Settings > System > Clipboard). This allows you to paste multiple copied items.
    • Win key + P: Open Project (display) menu for managing external displays or projectors.
    1. Window Management and Multitasking Shortcuts

    Efficiently arrange and switch between your open applications.

    • Alt + Tab: Switch between open applications. Hold Alt and repeatedly press Tab to cycle through windows, release Alt to select.
    • Alt + F4: Close the active window or application. If no window is active, it brings up the Shut Down dialog.
    • Ctrl + Shift + Esc: Open Task Manager directly (bypasses Ctrl + Alt + Del).
    • Win key + Left/Right Arrow: Snap the active window to the left or right half of the screen.
    • Win key + Up/Down Arrow:
      • Up: Maximize the window.
      • Down: Minimize the window (if maximized) or restore it (if not maximized).
    • Win key + Z: Open Snap Layouts (Windows 11 only) for easy window tiling.
    • Win key + Ctrl + D: Create a new virtual desktop.
    • Win key + Ctrl + Left/Right Arrow: Switch between virtual desktops.
    • Win key + Ctrl + F4: Close the current virtual desktop.
    1. Application-Specific Shortcuts (Examples)

    Many individual applications also have their own specific shortcuts. Look for “Hotkeys” or “Keyboard Shortcuts” in an app’s help menu or settings.

    • Web Browsers (Chrome, Edge, Firefox):
      • Ctrl + T: Open new tab.
      • Ctrl + W: Close current tab.
      • Ctrl + Shift + T: Reopen last closed tab.
      • Ctrl + Tab / Ctrl + Shift + Tab: Switch between tabs.
      • Ctrl + N: Open new browser window.
      • Ctrl + Shift + N: Open new Incognito/InPrivate window.
    • Microsoft Word:
      • Ctrl + B, I, U: Bold, Italic, Underline.
      • Ctrl + K: Insert hyperlink.
      • Ctrl + E, L, R: Center, Left, Right align text.
    • Microsoft Excel:
      • Ctrl + ;: Insert current date.
      • Ctrl + Shift + ;: Insert current time.
      • Ctrl + 1: Open Format Cells dialog.
      • Ctrl + Spacebar: Select entire column.
      • Shift + Spacebar: Select entire row.

    How to Incorporate Shortcuts into Your Routine

    1. Start Small: Don’t try to memorize everything at once. Pick 2-3 shortcuts that you’ll use frequently (e.g., Ctrl + C, Ctrl + V, Win key + D).
    2. Practice Consistently: Consciously try to use those shortcuts instead of the mouse for a week. It will feel awkward at first, but it will become second nature.
    3. Expand Gradually: Once the first set feels natural, add a few more to your repertoire.
    4. Observe Your Workflow: Pay attention to repetitive mouse actions. Is there a shortcut for that? (e.g., constantly switching between apps? Use Alt + Tab).
    5. Utilize Cheat Sheets: Keep a small list of frequently used shortcuts near your desk or set it as your desktop background temporarily.

    By integrating these keyboard shortcuts in Windows for productivity into your daily computer usage, you’ll find yourself working faster, more efficiently, and with greater control over your operating system. It’s an investment that pays off in time saved every single day.

  • How to Monitor fan Speed and Adjust Cooling on your PC

    How to Monitor fan Speed and Adjust Cooling on your PC

    Maintaining optimal temperatures inside your PC is crucial for its performance, stability, and longevity. Overheating can lead to system slowdowns, crashes, and even permanent damage to components like your CPU and GPU. Your PC’s fans are the primary mechanism for moving air and dissipating heat. Knowing how to monitor fan speed and adjust cooling settings empowers you to keep your system running efficiently, quietly, and cool. This guide will walk you through the various methods to check fan RPMs and control your PC’s cooling profile.

    Why Monitor Fan Speed and Adjust Cooling?

    Understanding and controlling your PC’s fans offers several benefits:

    • Prevent Overheating: Ensure components stay within safe operating temperature ranges, especially under heavy load.
    • Optimize Performance: Components like CPUs and GPUs can “throttle” (reduce their speed) when too hot, leading to performance drops. Proper cooling prevents this.
    • Reduce Noise: Set fan curves to run quieter during light tasks and only ramp up when temperatures demand it.
    • Diagnose Issues: Unusual fan speeds (too high or too low) can indicate a problem with a fan, sensor, or dust buildup.
    • Extend Component Lifespan: Consistent high temperatures can shorten the lifespan of electronic components.

    Understanding PC Fans and Their Connections

    Before we dive into monitoring and adjusting, let’s briefly look at the types of fans and how they connect to your motherboard:

    • CPU Fan: Cools your processor. Almost always connected to a dedicated CPU_FAN header on the motherboard.
    • Case Fans: Move air in and out of your PC case. Connected to SYS_FAN, CHA_FAN, or similar headers.
    • GPU Fans: Integrated into your graphics card. Controlled by the GPU’s own BIOS and drivers, though some software can influence them.
    • PSU Fan: Integrated into your power supply. Usually self-regulating and not user-adjustable.

    Most adjustable fans connect via 3-pin (voltage control) or 4-pin (PWM – Pulse Width Modulation – for more precise digital control) headers. PWM fans offer better control.

    Step-by-Step Guide: How to Monitor Fan Speed

    There are several ways to check your PC’s fan speeds, from simple software to more advanced monitoring tools.

    Step 1: Use BIOS/UEFI Settings (Initial Check & Basic Control)

    Your PC’s BIOS (Basic Input/Output System) or UEFI (Unified Extensible Firmware Interface) offers the most direct way to monitor fan speed and often provides basic control without needing additional software.

    1. Reboot Your PC: Restart your computer.
    2. Enter BIOS/UEFI: As your PC starts, repeatedly press the designated key to enter BIOS/UEFI setup. Common keys include Del, F2, F10, F12, or Esc. The specific key is usually displayed on the screen during startup.
    3. Navigate to Fan/Monitor Section: Once in BIOS/UEFI, look for sections labeled “PC Health Status,” “Hardware Monitor,” “Monitor,” “Fan Control,” or “Q-Fan Control” (on ASUS boards).
    4. View Fan RPMs: Here, you should see the fan speed (measured in RPM – Revolutions Per Minute) for your CPU fan and connected case fans. You might also see temperature readings for your CPU and motherboard.
    5. Basic Fan Control: Many BIOS/UEFI settings offer simple fan control options like “Standard,” “Silent,” “Performance,” or “Manual.” In manual mode, you might be able to set a basic fan curve based on temperature.
    6. Exit BIOS/UEFI: Save your changes and exit.

    Step 2: Use Third-Party Monitoring Software (Recommended for Windows)

    For real-time, in-depth fan speed monitoring and temperature tracking while in Windows, third-party software is essential.

    1. Choose a Reliable Software:
      • HWMonitor: A simple, lightweight tool that displays a wide range of sensor readings, including fan RPMs, temperatures (CPU, GPU, motherboard), and voltages. It’s excellent for just monitoring.
      • HWInfo64: More comprehensive than HWMonitor, providing even more detailed sensor data. Can be overwhelming initially but offers invaluable information.
      • SpeedFan (Older, but still works for some): An older but still popular tool that can monitor temperatures and fan speeds, and sometimes allows for direct fan control on older motherboards. Its interface can be less intuitive.
      • Open Hardware Monitor: Another free, open-source option for monitoring.
      • Manufacturer-Specific Software: Your motherboard manufacturer (e.g., ASUS AI Suite, MSI Dragon Center, Gigabyte System Information Viewer) or GPU manufacturer (e.g., MSI Afterburner, ASUS GPU Tweak) often provides their own monitoring and control utilities. These are highly recommended as they are tailored to your specific hardware.
    2. Download and Install: Download the chosen software from its official website. Be cautious of unofficial download sites.
    3. Launch and Interpret: Run the software. You’ll typically see a list of detected sensors. Look for entries labeled “FanX” or “RPM” for your CPU fan and other case fans. You’ll also see CPU and GPU temperatures.
    4. Monitor During Load: To get meaningful readings, monitor fan speed while performing demanding tasks (e.g., gaming, video encoding) to see how fans respond to increased heat.

    Step-by-Step Guide: How to Adjust Cooling (Fan Speed)

    Adjusting your PC’s cooling involves setting fan curves – telling your fans how fast to spin at certain temperatures. This allows for a balance between performance and noise.

    Method 1: Adjust Cooling via BIOS/UEFI (Universal & Stable)

    This is the most reliable way to adjust cooling settings, as these settings are applied at a hardware level before the operating system even loads.

    1. Enter BIOS/UEFI: Follow Step 1 from the “How to Monitor Fan Speed” section to enter your BIOS/UEFI.
    2. Navigate to Fan Control: Find the “Fan Control” or “Monitor” section. It might be under “Advanced,” “Peripherals,” or “Hardware Monitor.”
    3. Locate Fan Headers: You’ll typically see entries for “CPU Fan,” “CHA_FAN1,” “SYS_FAN2,” etc.
    4. Choose Control Mode: For each fan, you’ll usually have options:
      • Auto/Standard: Motherboard automatically manages fan speed based on preset curves.
      • Silent: Prioritizes low noise, fans spin slower.
      • Performance/Turbo: Prioritizes cooling, fans spin faster.
      • Manual/Custom: This is where you can adjust cooling precisely. You’ll typically set a series of “temperature points” and a corresponding “fan speed percentage” (or RPM) for each point. For example:
        • 30°C: 30% speed
        • 50°C: 60% speed
        • 70°C: 90% speed
        • 85°C: 100% speed
    5. Adjust Fan Curves: Create or modify these fan curves to your preference. A good starting point is to have fans run quietly at idle temperatures and gradually ramp up as temperatures increase. Avoid sudden jumps in speed, as this can be jarring.
    6. Save and Exit: Save your changes and exit BIOS/UEFI. Test your new settings under various loads.

    Method 2: Adjust Cooling via Motherboard Manufacturer Software (Windows)

    Many motherboard manufacturers provide dedicated software that allows you to adjust cooling settings directly within Windows, often with a more user-friendly graphical interface than BIOS.

    1. Identify Software: Check your motherboard manufacturer’s website (e.g., ASUS, MSI, Gigabyte, ASRock) for their utility suite. Examples include:
      • ASUS: AI Suite (with Fan Xpert)
      • MSI: Dragon Center / MSI Center (with Frozr AI Cooling)
      • Gigabyte: System Information Viewer (SIV) / RGB Fusion
      • ASRock: A-Tuning / Polychrome Sync
    2. Download and Install: Download the latest version of the utility suite compatible with your specific motherboard model.
    3. Launch Software: Open the installed software.
    4. Navigate to Fan Control: Look for a section related to “Fan Control,” “Cooling,” or “System Tuning.”
    5. Adjust Fan Curves: You’ll usually find options to select individual fans (CPU fan, case fans) and then adjust their fan curves using a drag-and-drop interface or by entering values. These tools often allow you to test fan speeds and monitor temperatures live.
    6. Apply Settings: Apply the new settings. Most of these tools can save profiles for different scenarios (e.g., “Gaming,” “Silent,” “Default”).

    Method 3: Adjust Cooling via GPU-Specific Software (for Graphics Card Fans)

    Your graphics card has its own cooling solution, typically controlled by its own BIOS. However, software allows you to override default settings for better performance or quieter operation.

    1. Choose GPU Software:
      • MSI Afterburner: The most popular and versatile tool for GPU overclocking, monitoring, and fan control. Works with both NVIDIA and AMD GPUs.
      • ASUS GPU Tweak II/III: For ASUS graphics cards.
      • Gigabyte AORUS Engine: For Gigabyte graphics cards.
      • AMD Radeon Software / NVIDIA GeForce Experience: The official driver suites from AMD and NVIDIA also offer some basic fan control options, though Afterburner provides more granular control.
    2. Download and Install: Download the software from the GPU manufacturer’s website or the tool’s official page (e.g., Guru3D for MSI Afterburner).
    3. Launch and Navigate: Open the software and find the fan control section. In MSI Afterburner, toggle the “User Defined” fan speed control to enable custom fan curves.
    4. Adjust Fan Curve: Create a custom fan curve by setting temperature points and corresponding fan speeds (percentage). For example, you might want your GPU fans to stay off below 50°C for silence at idle, and then gradually ramp up.
    5. Apply and Test: Apply the new fan curve. It’s crucial to test these settings under load to ensure stable temperatures and acceptable noise levels. Be cautious with aggressive fan curves that lead to excessive noise, or too passive ones that allow for overheating.
    6. Apply on Startup: Most GPU fan control software allows you to apply your custom fan curve automatically when Windows starts. This is usually an option you tick within the software.

    General Tips for Effective PC Cooling

    Beyond adjusting fan speeds, these practices contribute to better cooling:

    • Clean Regularly: Dust is the enemy of cooling. Regularly clean your PC’s internal components, especially fans and heatsinks, using compressed air. Pay attention to CPU cooler fins, GPU heatsinks, and case fan blades.
    • Optimal Airflow: Ensure your PC case has good airflow. Generally, aim for positive pressure (more intake fans than exhaust fans) to minimize dust intake, or balanced pressure. Make sure intake fans bring in cool air and exhaust fans push out hot air efficiently.
    • Proper Cable Management: Tidy up internal cables. Cluttered cables can block airflow.
    • Ambient Temperature: Operate your PC in a cool, well-ventilated room.
    • Thermal Paste: If your CPU or GPU temperatures are consistently high even with good airflow and fan speeds, consider reapplying thermal paste between the CPU/GPU and their respective heatsinks. This is an advanced task and should be done carefully.

    Conclusion

    Knowing how to monitor fan speed and adjust cooling on your PC is a vital skill for any computer user. By utilizing your BIOS/UEFI, motherboard software, and GPU utilities, you gain precise control over your system’s thermal performance. This proactive approach not only helps prevent costly overheating issues but also allows you to find the perfect balance between keeping your PC cool and maintaining a quiet operating environment. Regular monitoring and occasional adjustments will ensure your PC runs optimally for years to come.

  • How to Flush DNS Using Windows Command Line

    How to Flush DNS Using Windows Command Line

    Have you ever tried to visit a website only to encounter an error, load an outdated version, or find that a site you recently moved to a new server isn’t accessible? These frustrating internet issues often stem from your computer’s DNS cache. The Domain Name System (DNS) is often called the “phonebook of the internet,” translating human-readable domain names (like google.com) into numerical IP addresses (like 172.217.160.142) that computers use to communicate. To speed up this process, your Windows computer maintains a local record of recently visited websites and their corresponding IP addresses in what’s known as the DNS resolver cache (or DNS cache).

    The concept of caching is fundamental to computer science, dating back to the earliest processors using small, fast memory to store frequently accessed data. In networking, DNS caching on a local machine, within a browser, or on a network’s recursive DNS servers, is designed to enhance performance by reducing the need to query external DNS servers repeatedly. This makes Browse faster and more efficient. However, just like any cache, the DNS cache can become outdated, corrupted, or even maliciously altered. This is where flushing DNS comes in.

    This guide will explain what flushing DNS means and provide a clear, step-by-step process on how to perform this crucial troubleshooting step using the Windows Command Line.

    What is DNS Cache and Why Flush It?

    Your DNS cache is a temporary database stored on your Windows computer by the DNS Client service. It contains records of domain names you’ve recently visited and their corresponding IP addresses, along with a Time-To-Live (TTL) value, which dictates how long an entry remains valid in the cache.

    DNS Client Service: A core Windows service (also known as “dnscache”) responsible for resolving DNS domain names into IP addresses and maintaining the local DNS resolver cache.

    While designed for efficiency, the DNS cache can sometimes cause problems. Flushing DNS (also known as clearing the DNS cache) is the process of manually deleting these temporary entries from your computer.

    There are several common reasons why you might need to flush DNS:

    • Website Not Loading or “Site Not Found” Errors: If a website has recently changed its IP address (due to a server migration, for example), your local cache might still hold the old, incorrect IP. Flushing the cache forces your system to retrieve the updated information from external DNS servers.
    • Accessing Outdated or Incorrect Website Versions: Similar to the above, old cache entries can sometimes direct you to an outdated version of a website.
    • Internet Connectivity Issues: Corrupted or inconsistent entries in the DNS cache can lead to general Browse or connectivity problems. Clearing it can act as a “reset” for your internet connection’s name resolution.
    • Privacy Concerns: Your DNS cache essentially keeps a log of your recent Browse activity. Flushing it clears this local history, enhancing your privacy on a shared computer.
    • Security (DNS Cache Poisoning/Spoofing): In rare but severe cases, an attacker can manipulate your DNS cache (known as DNS cache poisoning or DNS spoofing) to redirect you to malicious or fraudulent websites, even when you type a legitimate URL. Flushing the cache removes these potentially harmful entries.
      • DNS Cache Poisoning/Spoofing: A type of cyberattack where attackers inject false or corrupted DNS data into a DNS resolver’s cache. This causes the resolver to return an incorrect IP address for a legitimate domain, redirecting users to malicious websites without their knowledge.
    • Speeding Up DNS Propagation: If you’ve made changes to your website’s DNS records (e.g., moved hosting), it can take time for these changes to propagate across the internet. Flushing your local DNS cache can speed up the process of your computer recognizing the new records.

    How to Flush DNS Using Windows Command Line

    The process is quick and simple, using the ipconfig command with the /flushdns switch.

    Method 1: Using Command Prompt as Administrator

    This is the standard and most reliable method for flushing DNS.

    • Step 1: Open Command Prompt as Administrator.
      • Click the Start button (Windows logo) or press the Windows key.
      • Type cmd into the search bar.
      • From the search results, right-click on “Command Prompt.”
      • Select “Run as administrator.”
      • If the User Account Control (UAC) prompt appears, click “Yes” to grant administrative privileges.
    • Step 2: Execute the Flush DNS Command.
      • In the Command Prompt window, type the following command exactly as shown (note the space after ipconfig): ipconfig /flushdns
      • Press Enter.
    • Step 3: Confirm Success.
      • You should see a message confirming the action: Windows IP Configuration Successfully flushed the DNS Resolver Cache.

    This indicates that your DNS cache has been cleared. You can now try accessing the website or service that was giving you trouble.

    Method 2: Restarting the DNS Client Service (More Comprehensive)

    While ipconfig /flushdns clears the cache, sometimes restarting the DNS Client service itself can resolve deeper DNS-related issues, as it reinitializes the service responsible for managing the cache.

    • Step 1: Open Command Prompt as Administrator.
      • Follow Step 1 from Method 1 above.
    • Step 2: Stop the DNS Client Service.
      • Type the following command and press Enter: net stop dnscache
      • You should see a message indicating “The DNS Client service was stopped successfully.”
    • Step 3: Start the DNS Client Service.
      • Type the following command and press Enter: net start dnscache
      • You should see a message indicating “The DNS Client service was started successfully.”

    This process effectively clears the DNS cache and restarts the service, often resolving stubborn DNS-related problems.

    Method 3: Verifying the DNS Cache (Optional)

    You can check the contents of your DNS cache before and after flushing to see the effect.

    • Step 1: Open Command Prompt (as regular user or administrator).
    • Step 2: Display DNS Cache Content.
      • Type the following command and press Enter: ipconfig /displaydns
      • This will show you a detailed list of all entries currently in your DNS cache. It can be quite long!
    • Step 3: Flush DNS (using ipconfig /flushdns).
    • Step 4: Display DNS Cache Content Again.
      • Run ipconfig /displaydns again. You should now see a much shorter list, or a message stating “Could not display the DNS Resolver Cache,” indicating it’s empty.

    What Happens After Flushing DNS?

    After you flush DNS, your computer no longer has any cached IP addresses for websites or services. The next time you try to access a website:

    • Your computer will perform a fresh DNS lookup, querying your configured DNS servers (usually provided by your internet service provider or a public DNS service like Google DNS or Cloudflare DNS).
    • This first lookup for each domain might take a tiny bit longer than if it were served from the cache, but subsequent visits will be fast again as new, up-to-date entries are added to your cache.
    • Crucially, this ensures you’re connecting to the correct and latest IP address for the domain you intend to visit.

    General Troubleshooting with DNS Flush

    Flushing DNS is a common and safe first step in troubleshooting various internet and network issues. If you’re experiencing:

    • Websites not loading properly.
    • Errors like “DNS server not responding” or “This site can’t be reached.”
    • Inability to connect to online games or services.
    • Issues after changing web hosting or domain settings.

    A DNS flush is often recommended. If the problem persists after flushing, you might need to investigate other network settings, your DNS server configuration, firewall, or even contact your internet service provider.

    By understanding the importance of the DNS cache and knowing how to flush it using the Windows Command Line, you gain a powerful tool to resolve common internet connectivity issues and maintain a secure and efficient online experience.

    Frequently Asked Questions (FAQ)

    Q1: What does “flush DNS” mean?

    Flush DNS” means to clear or empty your computer’s DNS resolver cache. This cache temporarily stores the IP addresses of websites you’ve visited, and flushing it forces your computer to get fresh, updated DNS information from external DNS servers the next time you try to access those websites.

    Q2: Why would I need to flush my DNS cache?

    You might need to flush DNS to: * Resolve internet connectivity issues like “site not found” errors or inability to access certain websites. * Ensure you’re connecting to a website’s updated IP address after a domain migration or server change. * Address DNS cache poisoning or spoofing threats by removing corrupted entries. * Improve privacy by clearing a record of your recent Browse history from your local system.

    Q3: Is it safe to flush DNS? Will it break my internet connection?

    Yes, flushing DNS is completely safe and will not break your internet connection. At most, the very first time you visit a website after flushing, it might take a fraction of a second longer to load as your system performs a new DNS lookup. Your DNS cache will then start rebuilding automatically.

    Q4: How often should I flush my DNS?

    There’s no need to flush DNS regularly as routine maintenance. Only do it when you are experiencing specific problems like difficulty accessing websites, seeing outdated content, or suspecting DNS cache poisoning. For most users, it’s a troubleshooting step, not a daily task.

    Q5: Does flushing DNS clear my browser’s cache or cookies?

    No, flushing DNS only clears your operating system’s local DNS resolver cache. It has no effect on your web browser’s cache (which stores website content like images and HTML files), cookies, or Browse history. You would need to clear those separately within your browser’s settings.

    Q6: What is the ipconfig /flushdns command?

    ipconfig /flushdns is the specific Command Line command in Windows that tells the DNS Client service to immediately clear all entries from your computer’s DNS resolver cache. This command helps resolve DNS-related issues by forcing your system to perform fresh DNS lookups.

    Q7: If flushing DNS doesn’t fix my internet problem, what should I try next?

    If flushing DNS doesn’t resolve your issue, you can try: * Restarting your router and modem. * Running the Windows Network Troubleshooter. * Changing your DNS servers (e.g., to Google DNS 8.8.8.8 or Cloudflare DNS 1.1.1.1). * Checking for malware that might be interfering with your network. * Resetting your network adapters. * If the problem persists, contact your Internet Service Provider (ISP).

  • How to Schedule Tasks using Task Scheduler in Windows

    How to Schedule Tasks using Task Scheduler in Windows

    The Windows Task Scheduler is a powerful, built-in utility that allows you to automate a wide variety of tasks on your computer. Whether you want to run a specific program at startup, launch a backup script every night, or even just display a reminder message at a certain time, Task Scheduler can handle it. This guide will walk you through the process of creating and managing scheduled tasks on your Windows system.

    As someone who relies on automation to keep my digital life running smoothly, I’ve found the Task Scheduler to be an indispensable tool. It might seem daunting at first glance, but once you understand its core components, you’ll see how versatile it is.

    Step 1: Open Task Scheduler

    There are several ways to access the Task Scheduler in Windows:

    • Search Bar: The quickest way is to type “Task Scheduler” into the Windows search bar (or Start Menu search) and select the application from the results.
    • Run Dialog: Press Windows Key + R to open the Run dialog, type taskschd.msc, and press Enter.
    • Control Panel: Navigate to Control Panel > Administrative Tools > Task Scheduler.

    Once opened, you’ll see the Task Scheduler interface, which consists of a navigation pane on the left, a center pane displaying tasks, and an actions pane on the right.

    Step 2: Create a Basic Task

    For most users, creating a basic task is the simplest way to get started. This wizard-driven approach streamlines the process.

    1. Click “Create Basic Task…”: In the “Actions” pane on the right side of the Task Scheduler window, click on “Create Basic Task…”. This will open the Create Basic Task Wizard.
    2. Name and Describe the Task:
      • Name: Give your task a clear and descriptive name (e.g., “Daily Backup Script,” “Morning News App Launch”).
      • Description (Optional): Add a brief description of what the task does. This is helpful for remembering the purpose of the task later.
      • Click “Next.”
    3. Choose a Trigger: A trigger defines when your task will start. Select one of the following options:
      • Daily: Runs every day or every X days.
      • Weekly: Runs on specific days of the week.
      • Monthly: Runs on specific days of the month or on specific days of the week within a month.
      • One time: Runs only once at a specified date and time.
      • When the computer starts: Runs every time Windows boots up.
      • When I log on: Runs every time you log into your user account.
      • When a specific event is logged: Runs when a particular event occurs in the Windows Event Log (more advanced).
      • After selecting your preferred trigger, click “Next.”
    4. Configure Trigger Details: Depending on the trigger you chose, you’ll need to specify further details.
      • For “Daily,” “Weekly,” or “Monthly,” you’ll set a start date and time, and specify recurrence (e.g., “recur every 1 day”).
      • For “One time,” you’ll set a specific date and time.
      • Click “Next.”
    5. Choose an Action: An action specifies what the task will do when triggered.
      • Start a program: This is the most common action. You can launch an application, a script (like a .bat, .ps1, or .vbs file), or an executable.
      • Send an e-mail: (Less common now, as many email clients handle scheduling).
      • Display a message: Pops up a message box on your screen.
      • Select “Start a program” and click “Next.”
    6. Configure Program Details:
      • Program/script: Click “Browse…” and navigate to the executable file (.exe), script file, or batch file you want to run.
      • Add arguments (optional): If the program or script requires command-line arguments, enter them here.
      • Start in (optional): Specify the working directory for the program. This is often the folder where the program’s executable is located.
      • Click “Next.”
    7. Review and Finish: A summary of your task will be displayed.
      • Review all the settings. If you need to make changes, click “Back.”
      • Optionally, check “Open the Properties dialog for this task when I click Finish” if you want to configure more advanced settings immediately.
      • Click “Finish.”

    Your task is now created and will appear in the Task Scheduler Library.

    Step 3: Create an Advanced Task (Create Task…)

    For more granular control and advanced options, use the “Create Task…” option. This gives you access to multiple tabs for detailed configuration.

    1. Click “Create Task…”: In the “Actions” pane, select “Create Task…”.
    2. General Tab:
      • Name: Give it a clear name.
      • Description: Add a detailed description.
      • Security options:
        • Run whether user is logged on or not: This is useful for tasks that need to run in the background without a user logged in, such as server backups. Requires the task to run with elevated privileges.
        • Run with highest privileges: Essential for tasks that need administrator rights.
        • Configure for: Choose the operating system your task is running on (e.g., Windows 10, Windows Server 2019).
      • Click “OK” to apply changes on any tab.
    3. Triggers Tab:
      • Click “New…” to create a new trigger.
      • You’ll see more options than in the Basic Task Wizard, such as:
        • Begin the task: “On a schedule,” “At startup,” “At log on,” “On idle,” “On an event,” etc.
        • Advanced settings: “Delay task for,” “Repeat task every,” “Stop task if it runs longer than,” “Expire,” “Enabled.” These allow for fine-tuning the trigger behavior.
      • Configure your desired trigger and click “OK.”
    4. Actions Tab:
      • Click “New…” to create a new action.
      • Similar to the basic task, “Start a program” is the most common. Specify the program/script path and any arguments.
      • Click “OK.”
    5. Conditions Tab:
      • This tab allows you to set specific conditions that must be met for the task to run.
      • Power: “Start the task only if the computer is on AC power,” “Stop if the computer switches to battery power.” Crucial for laptop users to prevent battery drain.
      • Network: “Start only if the following network connection is available.” Useful if your task requires internet access or a specific network drive.
      • Idle: “Start only if the computer is idle for…” and “Stop if the computer ceases to be idle.”
    6. Settings Tab:
      • Allow task to be run on demand: Enables manual execution of the task.
      • Run task as soon as possible after a scheduled start is missed: Important for tasks that absolutely must run.
      • If the task is already running, then the following rule applies: Choose how to handle multiple instances of the task (e.g., “Do not start a new instance,” “Queue a new instance,” “Stop the existing instance”).
      • Stop the task if it runs longer than: Prevents a runaway process.
      • If the running task does not end when requested, force it to stop: For stubborn tasks.
    7. Click “OK” once you have configured all tabs to your satisfaction. You might be prompted to enter your user password if you’ve selected “Run whether user is logged on or not” or “Run with highest privileges.”

    Step 4: Manage and Modify Scheduled Tasks

    Once tasks are created, you’ll often need to manage them.

    1. Locate Tasks: All your created tasks are listed in the Task Scheduler Library in the left navigation pane. You can also create subfolders within the library to further organize your tasks.
    2. Enable/Disable a Task:
      • Right-click on the task name.
      • Select “Disable” or “Enable.” Disabling a task temporarily stops it from running without deleting its configuration.
    3. Run a Task Manually:
      • Right-click on the task name.
      • Select “Run.” This is useful for testing your task immediately.
    4. End a Running Task:
      • If a task is currently running, its status will show “Running.”
      • Right-click on the task name and select “End.”
    5. View Task Properties:
      • Right-click on the task name and select “Properties.” This opens the same advanced configuration tabs from Step 3, allowing you to modify any setting.
    6. Delete a Task:
      • Right-click on the task name.
      • Select “Delete.” Confirm your choice.
    7. View Task History:
      • In the Task Scheduler Library, select a task.
      • In the bottom-center pane, click on the “History” tab. This shows a log of when the task ran, whether it succeeded or failed, and any associated events. If “History” is disabled, you can enable it in the “Actions” pane under “Enable All Tasks History.”

    Common Uses for Task Scheduler

    • Automating Backups: Run backup scripts (e.g., using Robocopy) to external drives or network locations.
    • Running Disk Cleanup: Schedule cleanmgr.exe to automatically free up disk space.
    • Updating Software: Schedule checks for software updates.
    • Launching Specific Applications: Automatically open your email client or a specific work application at startup.
    • System Maintenance: Schedule chkdsk or defragmentation (though modern Windows handles this automatically).
    • Custom Notifications: Display a message reminder for important events.

    The Windows Task Scheduler is a robust tool that significantly enhances your ability to automate routine computer tasks. By understanding how to create and manage tasks, you can make your Windows experience more efficient and productive. Experiment with different triggers and actions to discover its full potential for your specific needs.